How Much Bitrate to Reduce When Converting H264 to HEVC with FFMPEG, and How to Measure Transcoding Loss Using SSIM (Structural Similarity Index)
Recently, I’ve been organizing some videos and realized I have too many. I wanted to shrink some videos that already needed transcoding. Previously, I increased the bitrate by 10-20% to compensate for transcoding losses, but when converting from H264 to HEVC (or other formats), it might not be necessary to increase the bitrate—you might even be able to reduce it.
But how much should you reduce the bitrate?
HEVC files are generally 50-80% the size of H264 files, but this range is quite large.
Judging by eye is too subjective and cumbersome to do every time. So I looked for technical evaluation methods to find a reasonable reduction ratio.
FFMPEG supports SSIM (Structural Similarity Index), which can assess the difference between two videos. We’ll use this metric.
When transcoding, you first need to consider the original video’s bitrate. At extremely high bitrates, even reducing the bitrate to 5% of the original won’t cause significant quality degradation. However, at low bitrates, a 50% reduction will have a noticeable impact.
Second, you need to consider your acceptable level of quality loss. To do this, you’ll need to conduct experiments to establish a relationship between SSIM values and visual perception.
SSIM Testing
It’s important to note that SSIM is only a reference. It indicates transcoding loss from a specific perspective, but the key factor is still what you see with your own eyes.
The tests are divided into two categories:
- First, I shot a 4K H264 video at 220Mbps using the Blackmagic Camera app (80MB file size).
- Second, I extracted a 1080P streaming movie clip at 5700Kbps (100MB file size).
These represent two common scenarios.For transcoding in this section, GPU acceleration was used for encoding.
The comparison test command is as follows:
ffmpeg -i [First File Path] -i [Second File Path] -lavfi "[0:v]settb=AVTB,setpts=PTS-STARTPTS[main];[1:v]settb=AVTB,setpts=PTS-STARTPTS[ref];[main][ref]ssim" -f null -
I used
-lavfi "[0:v]settb=AVTB,setpts=PTS-STARTPTS[main];[1:v]settb=AVTB,setpts=PTS-STARTPTS[ref];[main][ref]ssim"instead of the commonly found-filter_complex ssimonline because the latter caused recognition errors with my two videos. You can modify this based on your own situation.
You’ll see a process similar to encoding, followed by the final result:
SSIM Y:0.986175 (18.593297) U:0.995715 (23.680221) V:0.995205 (23.192565) All:0.989270 (19.693974)
It shows SSIM values for the YUV color channels and an overall “All” value.
At high bitrates, the SSIM curve only began to fluctuate when the bitrate was reduced to 10% of the original. Visually, this is where noticeable quality degradation started—for example, the video became less sharp (screenshots are omitted due to low-quality source material).
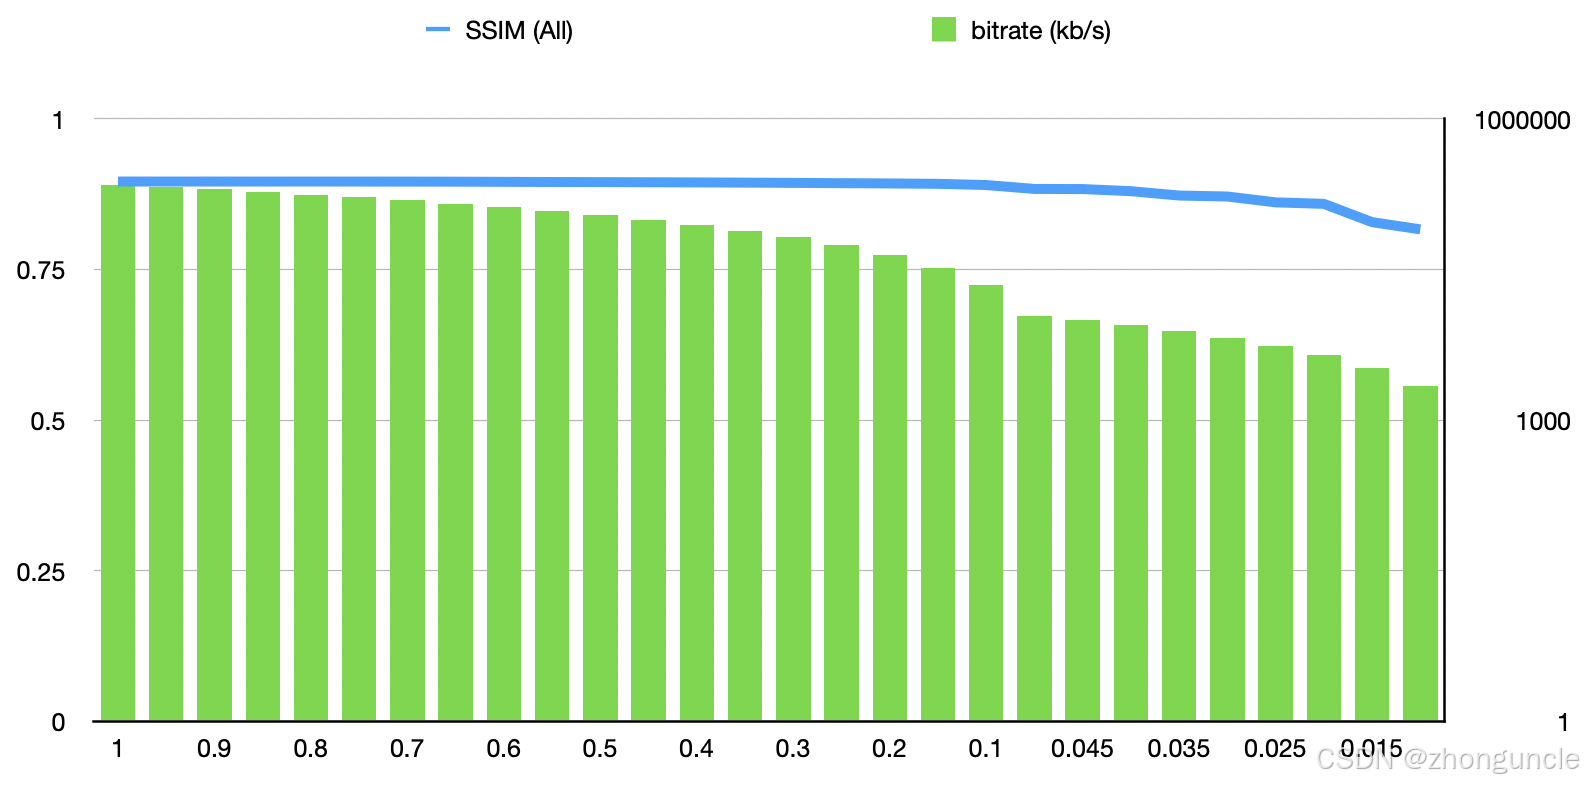
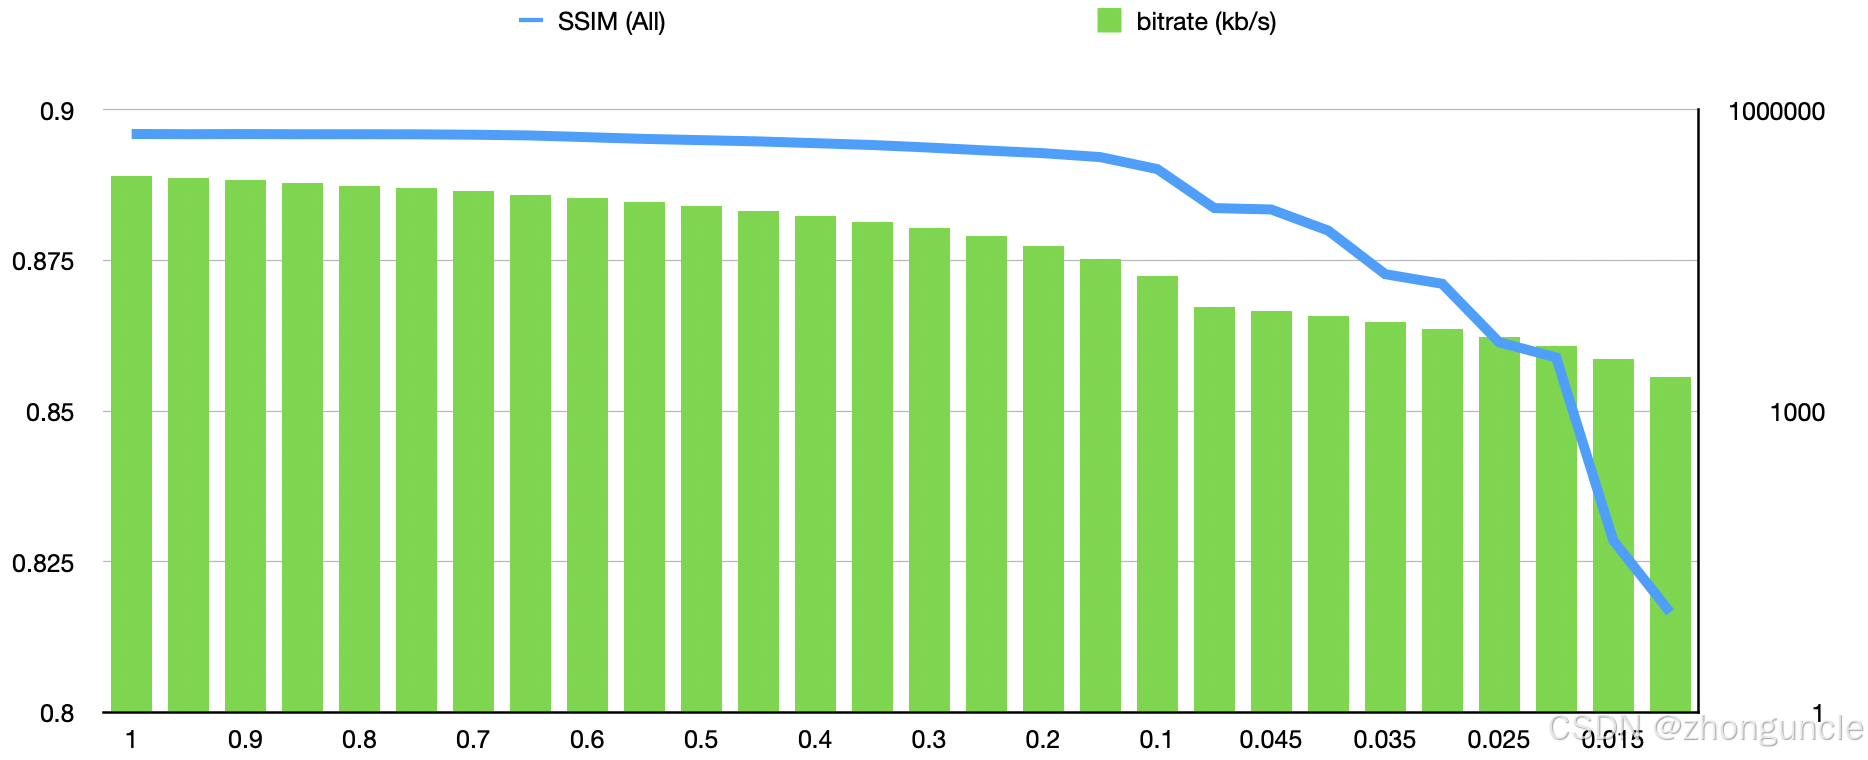
Adjusting the y-axis limits of the graph provides a more precise view of the changes:
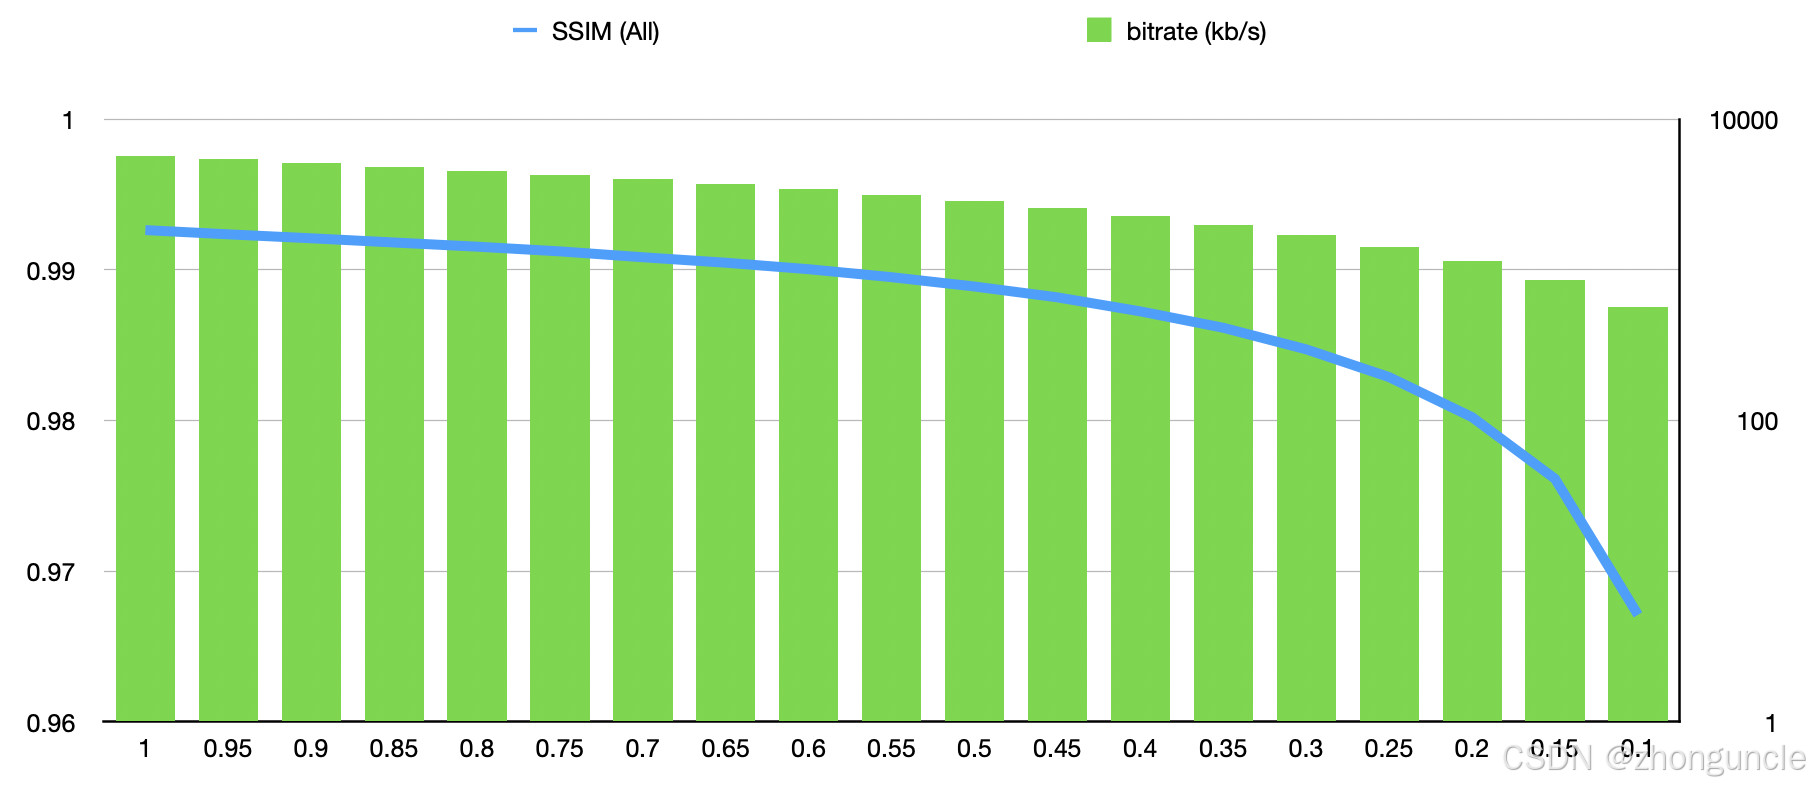
At typical streaming bitrates, significant SSIM loss began when the bitrate was reduced to around 50%. While visual quality loss was detectable, it was not obvious and still watchable. However, reducing the bitrate to 10% resulted in unacceptable quality.
Note: The y-axis limits here are different from the previous graph.
The first image below is the original file, the second is at 45% bitrate, and the third is at 10% bitrate. Notice the severe quality loss in the third image:


Based on the data:
- A SSIM difference of 0.01 compared to the original 100% bitrate results in visually detectable quality loss.
- A difference of 0.05–0.1 results in severe quality loss.
SSIM Is Only a Reference
We emphasize again: SSIM is merely a reference. It indicates transcoding loss from a specific perspective, but the key factor is still visual perception. Don’t put the cart before the horse.
For example, in special cases, two completely different videos might have an SSIM value as high as 0.9. However, when testing the original video against its transcoded version, this metric serves as a useful reference.
Transcoding Between Formats Always Involves Loss
First and foremost: converting between different codecs always results in quality loss—even if you don’t reduce the bitrate or even increase it by 20%. As seen in the tests above, SSIM never reaches 1.0 at 100% bitrate (0.992643 for the 5700Kbps test and 0.896002 for the 220Mbps test). You can use the --lossless option to ensure no loss, but this results in much higher bitrates and is not cost-effective.
For detailed information on lossless transcoding, see x265 - readthedocs.
Choosing a 75% Bitrate
From the tests above:
- A 50% bitrate reduction will definitely cause quality loss (though not obvious).
- Between 50% and 100% bitrate, the quality change is minimal. We can take a middle ground.
Additionally, in the Blackmagic Camera app, H264 encoding uses 220Mbps, while HEVC uses 160Mbps—approximately 73% of the original bitrate.
Thus, a 75% bitrate reduction is a reasonable choice.
After fully transcoding a ~680MB video, the resulting SSIM was 0.989270, with no noticeable visual difference. This confirms the ratio is appropriate: it saves a quarter of the file size. While insignificant for small files, reducing 1TB to 0.75TB makes a huge difference.
Converting H264 to HEVC with FFMPEG
To convert H264 to HEVC using FFMPEG, use the following command:
ffmpeg -c:v libx264 -i /path/to/input/file -c:v libx265 -b:v <target_bitrate> -tag:v hvc1 /path/to/output/file
Explanation of parameters:
-c:v libx264: Uses the libx264 software decoder (for H264 input).-c:v libx265: Uses the libx265 software encoder (for HEVC output).-b:v <target_bitrate>: Sets the output bitrate. For high bitrates (e.g., 220Mbps), use220000kinstead of220m—the latter may result in an extremely low transcoded bitrate. During testing, using220mled to a mere7562 kb/soutput, which is far too low.-tag:v hvc1: Adds the HVC1 tag to support Apple’s HEVC implementation. Without this, the transcoded video may not play on Apple devices like Macs.
If you want to use Nvidia GPU acceleration, use this command:
ffmpeg -c:v h264_cuvid -i /path/to/input/file -c:v hevc_nvenc -b:v <target_bitrate> -tag:v hvc1 /path/to/output/file
Explanation of GPU-specific parameters:
-c:v h264_cuvid: Uses the hardware decoder (for H264 input). If you encounter format issues, switch to software decoding (remove this parameter) for better compatibility—speed is similar, but CPU usage will be higher.-c:v hevc_nvenc: Uses NVENC’s hardware encoder (for HEVC output).
I hope these will help someone in need~
References/Further Reading
- Structural similarity index measure - Wikipedia: Wikipedia’s explanation of SSIM, including how it’s calculated.
- H.265/HEVC Video Encoding Guide - FFMPEG: FFMPEG’s official guide to HEVC encoding—highly recommended if you’re working with HEVC.
- 11.237 ssim - FFmpeg Filters Documentation: FFMPEG’s official documentation for the SSIM filter.
Special thanks to Doubao for helping me convert the output data into tables, making it easier to create graphs.