How to clone Raspberry Pi system disk to smaller disk/SD card
Recently, one of old SSD is free. Although the writing speed is not fast, but enough for Gigabit network, so I want to replace the current disk of Raspberry Pi. Due to new system need setting, so I don’t plan to reinstall the system. In addition, this old disk is 120GB, which is smaller than the current disk (512GB), some common methods of copying hard drives cannot be used here.
This blog only requires the use of Raspberry Pi, rather than in another Linux device. But I use SSH to access the Raspberry Pi, so the screenshots will be in macOS style.
After writing blog, I confirmed the flow again and again, but I still recommend readers to back up important files.
This blog is long and the operation is also cumbersome, so I make a tool for use: https://github.com/ZhongUncle/clone_rasp_disk, I will update many features not mentioned here. If you think it useful, please give me a star! If you want to more features, please issue too!
Notice
Due to verifying this process repeatedly, so I re-format and re-sync to disk. and I encountered a problem: Since formatting does not clear all existing files, rysnc may be not synchronizing correctly or partitions’ setting is not set correctly, so the boot flow will be broken.
To avoid this problem, there are two ways:
- you can just overwrite the first 5GB partition of disk with “0” (use
dd) , it will cover the boot partition and some directories of system, so its size due to your installation and settings. - Completely erase the entire disk. It will takes more time, but it can ensure no problems.
Why I don’t use dd or SD card copier
This blog will not use the CLI program dd or the GUI application SD card copier.
When using dd to copy, it will copys the entire disk, which will cause the write to definitely fail (target disk is smaller than destination disk). And the speed is very slow. Even if we try to reduce the number of controllers passed and use better interface socket, writing from solid state to solid state is only 30~45MB/s (15~20MB/s without any optimization).
But SD card copier does not have this problem. But I don’t want to plug in HDMI cable to back socket of monitor, and it’s not suitable for daily backup and other operations, so I want to know how to use the CLI. If you can use desktop mode, it is recommended to use the SD card copier application directly. This method is much faster, and the speed can be stable at 50~70MB/s.
Workflow
The method in this blog is the same as the workflow principle of SD card copier: divide the target hard disk into two areas, the boot area (named bootfs, format Windows_FAT_32) and the usage area (also called the root area named rootfs , the format is Linux), and then use rsync to copy, which is much faster.
If you use lsblk -f on the Raspberry Pi (this is just for demonstration, a more detailed tool will be introduced later) to view the structure and file system of the hard disk, you can see:

If you are curious about why the Raspberry Pi’s boot partition
bootfsdoes not use the ext4 file system, this is because the minimum requirement is 16 GiB, but the boot area is a bit outrageous. In addition, using FAT32, a file system that can be read on Windows, Linux, and macOS, is also convenient for changing some settings (the Raspberry Pi can modify some configurations, such as HDMI levels, by modifying the files in the boot areabootfswait).
Due to startup requirements, we need partitions to exist on the hard disk in the order of “boot area - usage area”. So we need to format the startup area first, and then format the remaining part into the use area.
Step 1: Partition and create a new file system
First connect the two disks to the Raspberry Pi. Remember to format the target hard disk into a file system that Linux can recognize (on a Mac, you can use Disk Utility to format it as exFAT, or use Raspberry Pi Imager to format it as FAT32).
Next, use the parted tool to partition, not because it can be interactively operated, but mainly because it can display more detailed partition information, and it is more convenient to set some parameters.
First use the sudo parted -l command to obtain the currently connected hard disk information:
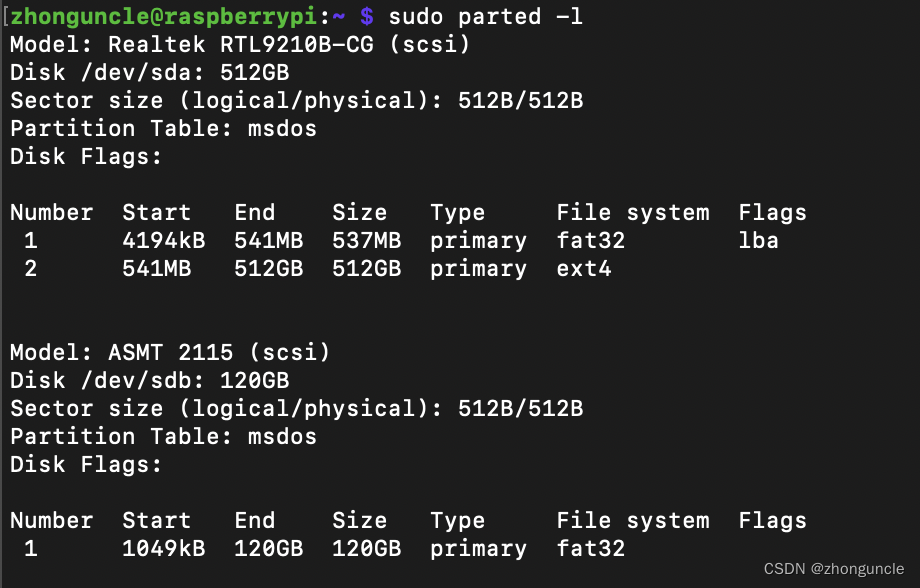
The first part is the system disk, where we can see the size, starting address, ending address, file system and other information of each partition. The second part is our target hard drive.
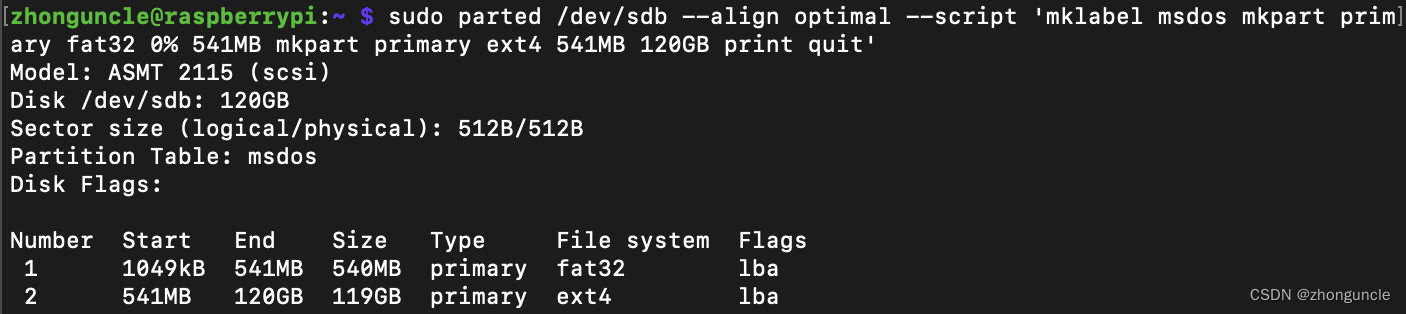
Then we use the following command to generate a similar partition structure on the target hard disk:
sudo parted /dev/sdb --script 'mklabel msdos mkpart primary fat32 4194.5kB 541MB mkpart primary ext4 541MB 100% print quit'
/dev/sdbis the device name of the target disk. Do not use/dev/sdb1, which is the name of an existing partition.- Using
--scriptwill not enter interactive mode, so one command can complete the operation. It should be noted that this option is not officially used, but if you follow the above content and do not use this option and directly follow the following commands, the entire hard disk partition will be destroyed (there will be a prompt). mklabel msdossets the partition mode to MBR format.gptis not used here because the system ismsdos(you can see this information from thePartition Tablein the picture above).mkpart primary fat32 4194.5kB 541MBThis part is the command to divide the boot area.primarymeans an independent partition (or called “primary partition”, which corresponds to “extended partition”). Use thefat32file system, and use4194.5kBas the starting address, because the Raspberry Pi starts from block 8192, but the value displayed bypartedis incorrect, as shown insudo fdisk -lThe content shall prevail. The termination address is the same as the termination address of the system disk.mkpart primary ext4 541MB 100%This part is the command to divide the root area. Using theext4file system, the starting address is the ending address of the boot area. And we can use100%to mean the termination address is the size of the hard disk, which is the same as120GBshown in the original picture.printwill print out partition information.exitwill exitparted.
It should be noted that this command cannot be split into two, because using
mkpartafter exiting will erase the original partition, so that one partition will be generated in the end.
Displayed as follows:
At this time, the work has not been completed. We need to manually create the FAT32 and ext4 file systems for the two partitions, as follows:
sudo mkfs.vfat -F 32 /dev/sdb1
sudo mkfs.ext4 -L rootfs /dev/sdb2
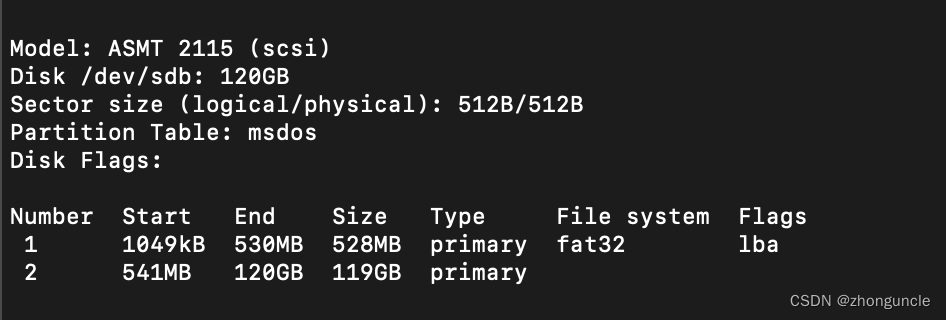
If you don’t do this step, some weird problems will occur. The previous partition information correctly shows that we have created a partition for ext4, numbered 2. But if you check it with sudo parted -l, you will find the following situation. In the File system column, the second partition does not have any information:
At this time, when loading this partition, the following error message will be prompted:
$ sudo mount /dev/sdb2 /mnt/rootfs/
mount: /mnt/rootfs: wrong fs type, bad option, bad superblock on /dev/sdb2, missing codepage or helper program, or other error.
        dmesg(1) may have more information after failed mount system call.
mount: (hint) your fstab has been modified, but systemd still uses
        the old version; use 'systemctl daemon-reload' to reload.
So create it manually.
Part 2: Copy using rsync
Before using rsync to copy, the two partitions need to be loaded.
First, create a new directory under the /mnt/ directory to mount the root partition:
sudo mkdir /mnt/rootfs
Then mount the root partition:
sudo mount /dev/sdb2 /mnt/rootfs/
So where to copy (synchronize) to? Do you still remember the content in the first picture of the blog? The directories corresponding to the two partitions on the system disk are displayed: /boot/firmware (boot partition) and / (root partition).
First is the boot partition:
sudo rsync -axHAWXS --numeric-ids --info=progress2 --exclude={"/mnt/","/boot/firmware/"} /* /mnt/rootfs
The options here mean the following:
ais the archive mode, which will read the directory recursively without destroying symbolic links, permissions and other information.xmeans that file system boundaries will not be crossed.Hpreserves hard links.Apreserves ACLs (Access Control Lists).Wdisables the incremental algorithm used by network transfers. Since these are all local paths, the speed can be increased.Scan handle sparse files efficiently so that they take up less space after transfer. (Without this, all source files may be 8GB, but the total destination files may be 10GB)numeric-idsuses numeric IDs instead of mappings.info=progress2will display the transfer progress and information, and the progress and information of the entire transfer, rather than the statistical information of each file.- There are several directories that do not need to be copied because they are duplicates, so use
--exclude=to exclude them. In many blogs about system cloning, other directories/dev,/sys,/procare listed that can be ignored, but after I spent two hours rescuing, I can confirm that directories like/dev,/sys,/proccannot be ignored (if I write a blog about how to rescue, I will list the link here)
Here is an explanation of the two excluded directories.
- The first
/mnt/is to avoid repeated copying, because this is the destination of the copy. Otherwise it will be copied twice or more. - The last
/boot/firmware/is because this part is the startup content, we will copy it separately later (copying it together may skip this part).
A bunch of errors will be prompted when copying some files in the /sys/ directory. Don’t worry about these errors, because they cannot be read (show no permission) or are virtual files. For details, please read this post: Why does rsync fail to copy files from /sys in Linux? - Unix & Linux stackexchange
Since some directories were excluded earlier, they need to be created manually here:
sudo mkdir /mnt/rootfs/mnt /mnt/rootfs/boot/firmware
Then you can mount the boot partition:
sudo mount /dev/sdb1 /mnt/rootfs/boot/firmware/
Then copy the boot partition. Most of the options here are the same as those in the boot partition:
sudo rsync -axHAWXS --numeric-ids --info=progress2 /boot/firmware/* /mnt/rootfs/boot/firmware/
If you are more careful, you will find that the original red soft link file has now turned blue:
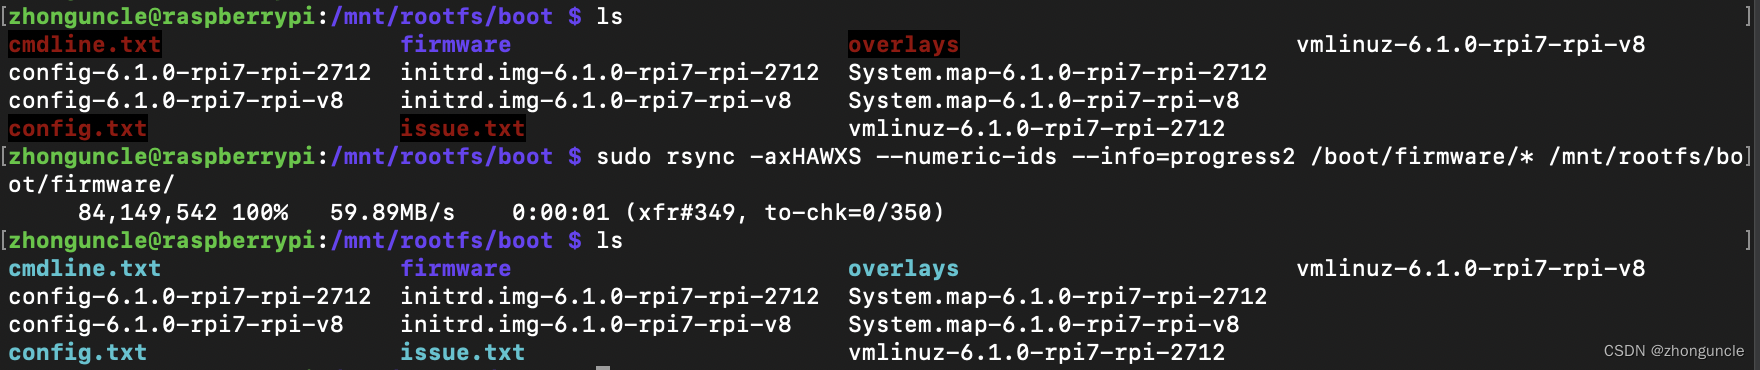
You can rely on this phenomenon to determine whether the copy is successful. But not all files can be judged in this way. For example, some soft link files in /proc/ may need to be automatically updated and generated later to turn red.
Step 3: Repair /etc/fstab and /boot/cmdline.txt
The /etc/fstab file lists all disk partitions that are automatically mounted at startup. Since we copied it directly, the UUID does not match, so it needs to be modified manually.
Use sudo fdisk -l to see the identifier of the hard disk in the Disk identifier section, which we will need later:
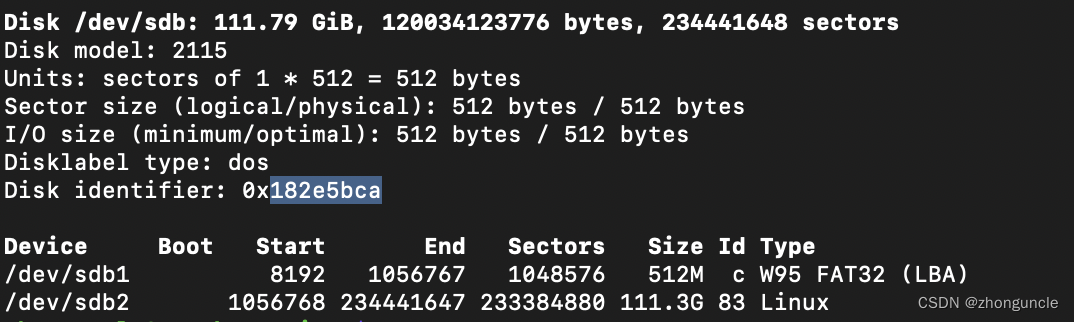
You can see the UUIDs of the two partitions /dev/sdb1 and /dev/sdb2. Modify the corresponding file based on this content. It should be noted that the modified file is /mnt/rootfs/etc/fstab (the path may be different), not /etc/fstab in the system disk .
Just change the two PARTUUID= in /mnt/rootfs/etc/fstab to the corresponding content, as follows (the picture below is unmodified, it stands to reason that only the last number of the two UUIDs is different):

Then modify the corresponding part in /mnt/rootfs/boot/cmdline.txt (this is a soft link, the actual file is in firmware) (the highlighted part in the figure below):

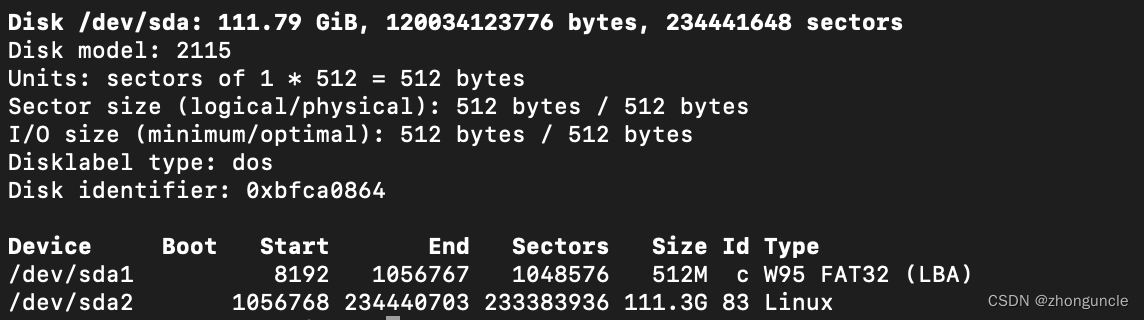
At this point everything is done. We can shut down the computer, unplug the original hard drive and try to start it up (be sure to unplug the old one, otherwise the old boot partition may be used to start the new one. I encountered this during the experiment, and then rescued the hard drive again) .
You can see that it can be used directly, with almost no difference. Use sudo fdisk -l to view the hard disk and you can see that the current /dev/sda is this hard disk.
Hope it can help those in need~
References or further reading
Although I spent a lot of time and energy experimenting and trying this blog, I would also like to thank many people for writing blogs and blogs that provided me with ideas and solutions.
How can I change the volume name of a FAT32 filesystem? - Unix & Linux stackexchange: This post introduces how to change the partition name for FAT32.
How to Format Disk Partitions in Linux - Dejan Tucakov: From this blog I learned that some command line partitioning tools do not create file systems , and then I discovered that parted was too.
Clone File System Hierarchy to Another Disk With Rsync - Francesco Galgani: This blog describes how to use rsync to clone a disk , it also solved a lot of rsync copy problems for me, and also provided inspiration for me to adjust the startup boot. The blog is mainly about Linux systems on popular devices, so it only mentions /etc/fstab, and the boot is through GRUB. The Raspberry Pi’s own system is booted through the config.txt and cmdline.txt files. If you want to try GRUB to boot the Raspberry Pi, you can check out this post GRUB on RPi 4 - Raspberry Pi Forums (I don’t have it) attempt, no guarantee is made as to the actual meaning of the content).
The config.txt file - Raspberry Pi Documentation: This is the official document of config.txt, although it is not used in this blog to config.txt, but this document introduces the general startup process of Raspberry Pi. I also found cmdline.txt from it to complete the final repair work.
Raspberry Pi 4 and Raspberry Pi 5 Boot Flow - Raspberry Pi Documentation: This part of the document introduces the detailed startup process, which can be viewed as extended reading.
Raspberry Pi 4/400 Bootloader Firmware Update/Recovery Guide - James A. Chambers: This blog introduces How to Repair and Update Launcher Firmware on Raspberry Pi 4/400. Because two hard drives are sometimes accidentally connected to the Raspberry Pi for startup at the same time, it may cause problems with the launcher firmware. You can read this blog to repair the firmware.