How to Adjust NVIDIA GPU Frequency, Volte and Other Settings on Linux (or Overlocking)
Recently, I wanted to adjust the frequency of my NVIDIA GPU on Linux because I noticed some software (like FaceFusion) doesn’t utilize the GPU at its maximum frequency (e.g., a maximum of 2000 MHz, but only 1850 MHz in practice). So I decided to figure out how to tweak settings like frequency. This article will use nvtop and nvidia-smi for monitoring.
I’ll first explain basic frequency adjustment, then cover undervolting and overclocking, and finally share adjustment strategies and precautions.
Linux has a policy table that the GPU follows for dynamic adjustments unless you manually lock the frequency. All settings in this article comply with this behavior. After adjusting frequencies as described in this section, you may notice both core and memory frequencies seem constrained by certain factors. For example, I set my memory frequency to
7500MHz (it stays at 7500 MHz when idle), but drops to7300MHz when running some programs. If you know why this happens, please let me know—or feel free to share your hypotheses for discussion.
Additionally, modifications on Linux reset after reboot, so you’ll need to reapply them each time. You can add them to your cron jobs or startup scripts (I won’t cover this here to keep the article concise).
Adjusting Frequencies, Power Limits, etc. (via nvidia-smi)
First, you need to get the GPU’s UUID or PCI Bus ID to specify which card to modify.
If you only have one GPU, you can simply use
0.
Let’s first check the frequency with nvtop (while running FaceFusion):
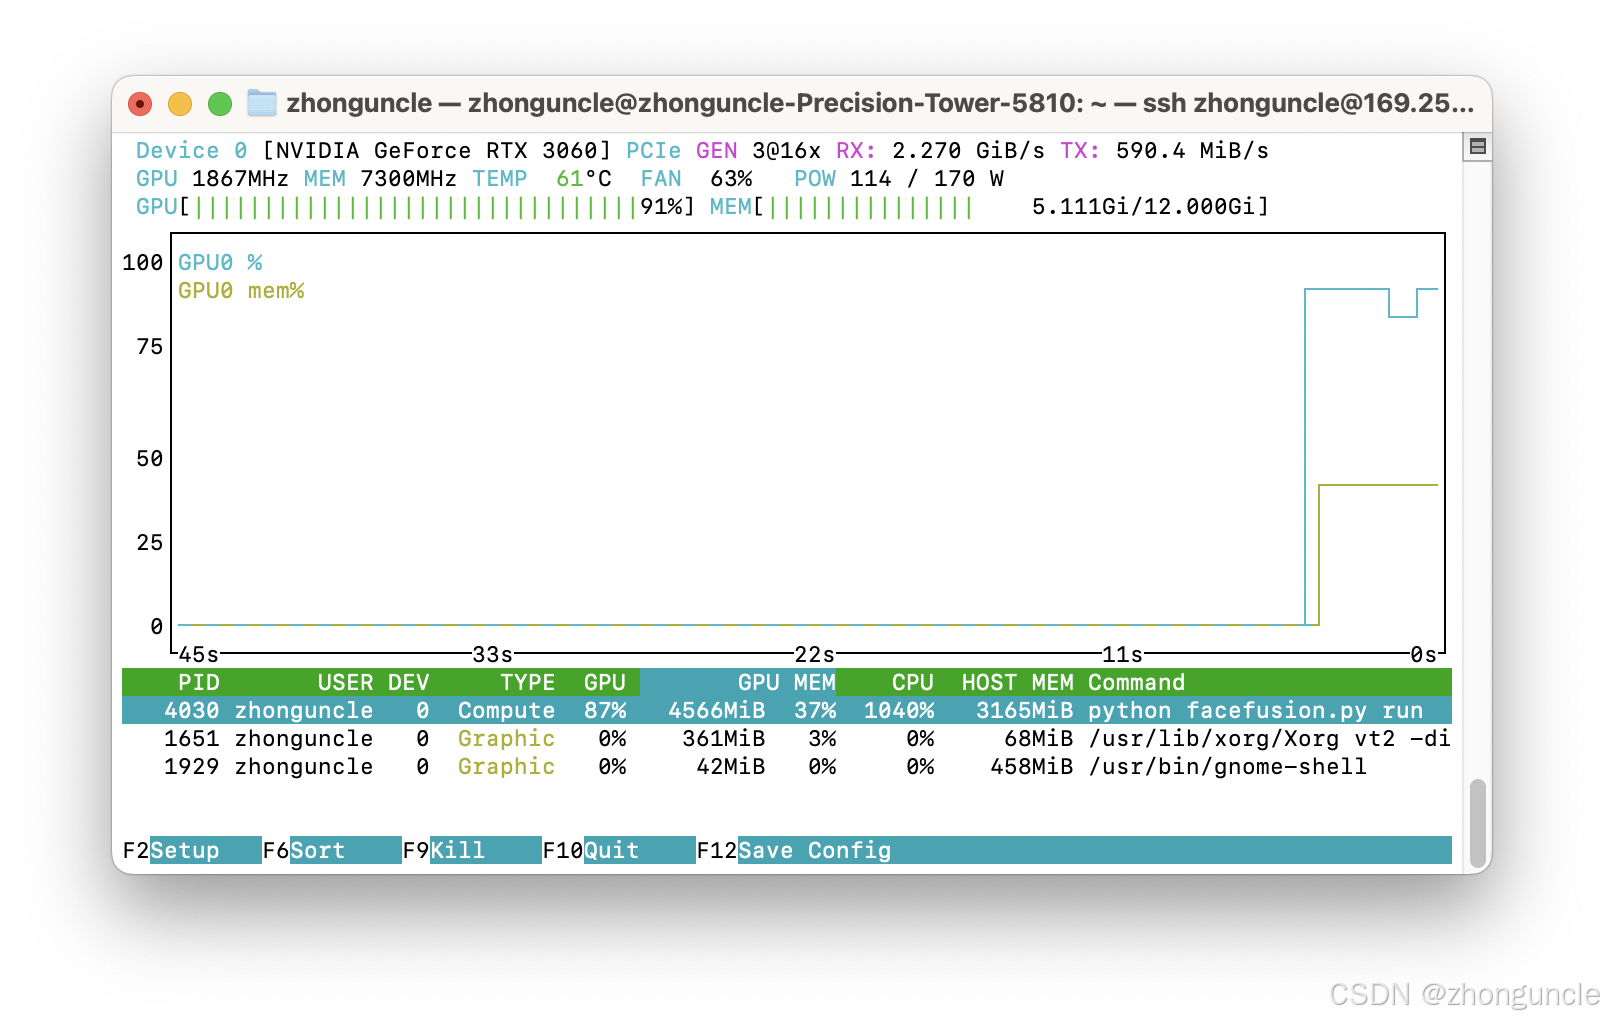
You can see the frequency is 1867 MHz and power consumption is 114W.
List your GPUs with nvidia-smi -L—here the RTX 3060’s UUID is GPU-037a6092-3f62-5b68-ac66-856918216320:
$ nvidia-smi -L
GPU 0: NVIDIA GeForce RTX 3060 (UUID: GPU-037a6092-3f62-5b68-ac66-856918216320)
Next, use sudo nvidia-smi --id=[UUID] -lgc [min_freq],[max_freq]. To lock the core frequency at 2000 MHz, set both min and max to 2000:
-lgc= lock core clock,-lmc= lock memory clock,-pl= power limit.
$ sudo nvidia-smi --id=GPU-037a6092-3f62-5b68-ac66-856918216320 -lgc 2000,2000
[sudo] password for zhonguncle:
GPU clocks set to "(gpuClkMin 2000, gpuClkMax 2000)" for GPU 00000000:03:00.0

Warning: persistence mode is disabled on device 00000000:03:00.0. See the Known Issues section of the nvidia-smi(1) man page for more information. Run with [--help | -h] switch to get more information on how to enable persistence mode.
All done.
The
Warningindicates persistence mode is disabled, meaning some tasks may not apply your changes.
To enable persistence mode, use -pm 1:
$ sudo nvidia-smi -pm 1
Enabled persistence mode for GPU 00000000:03:00.0.
All done.
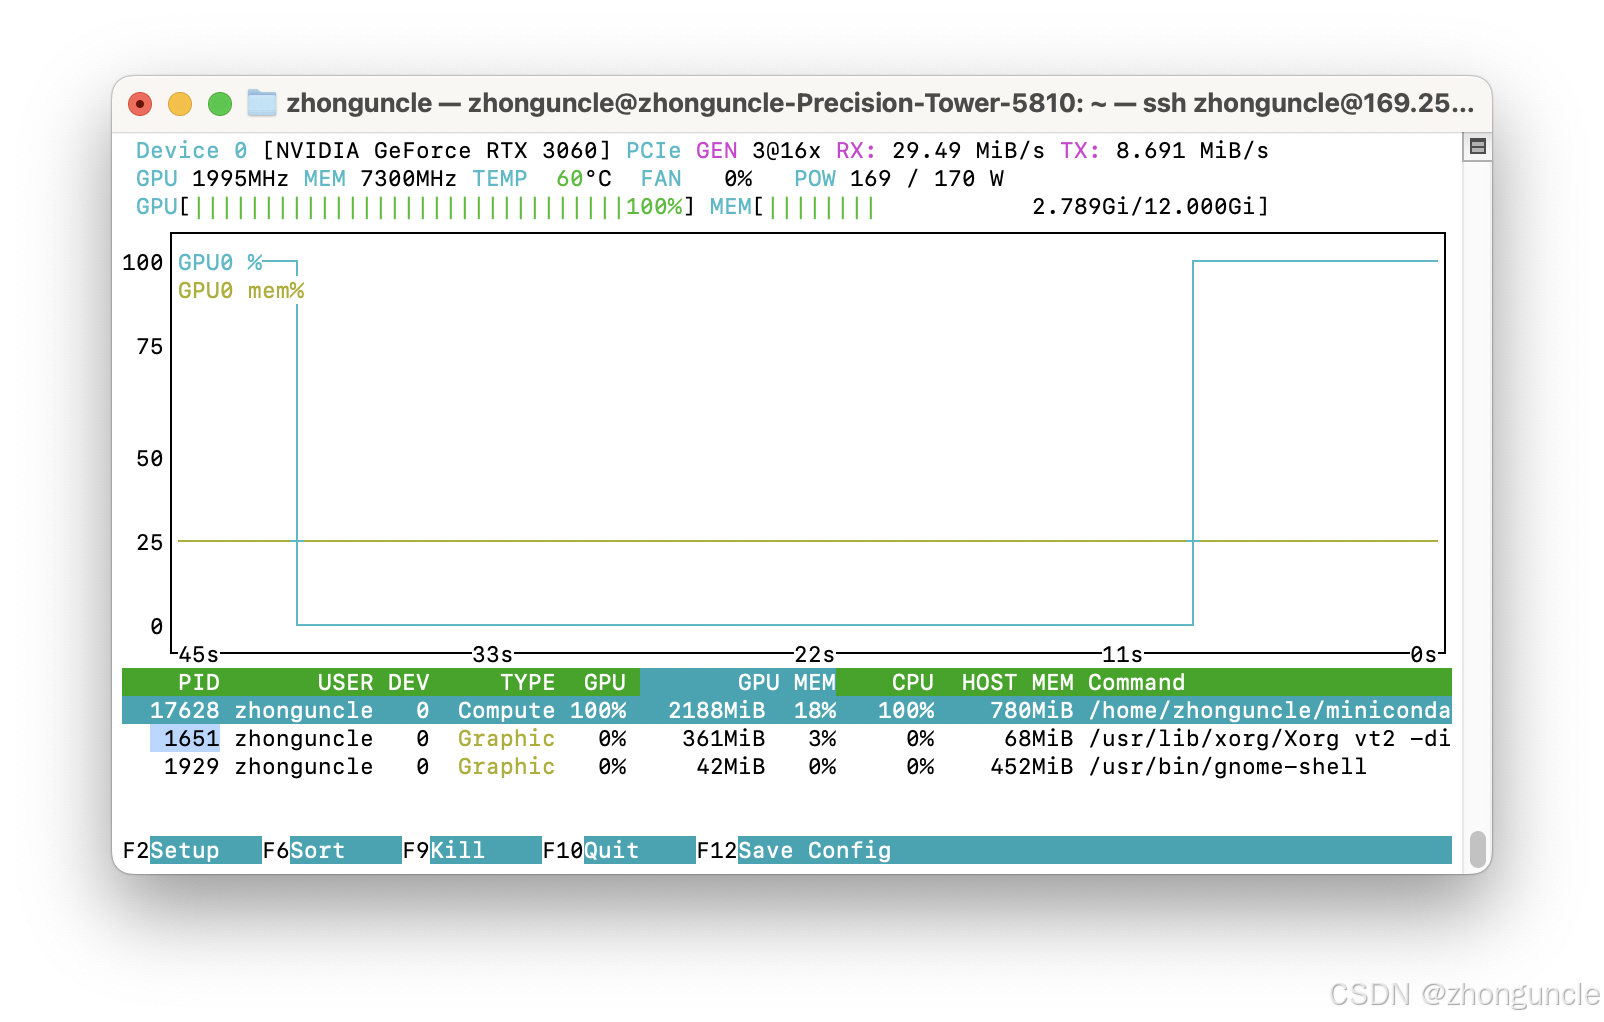
Check the status again:
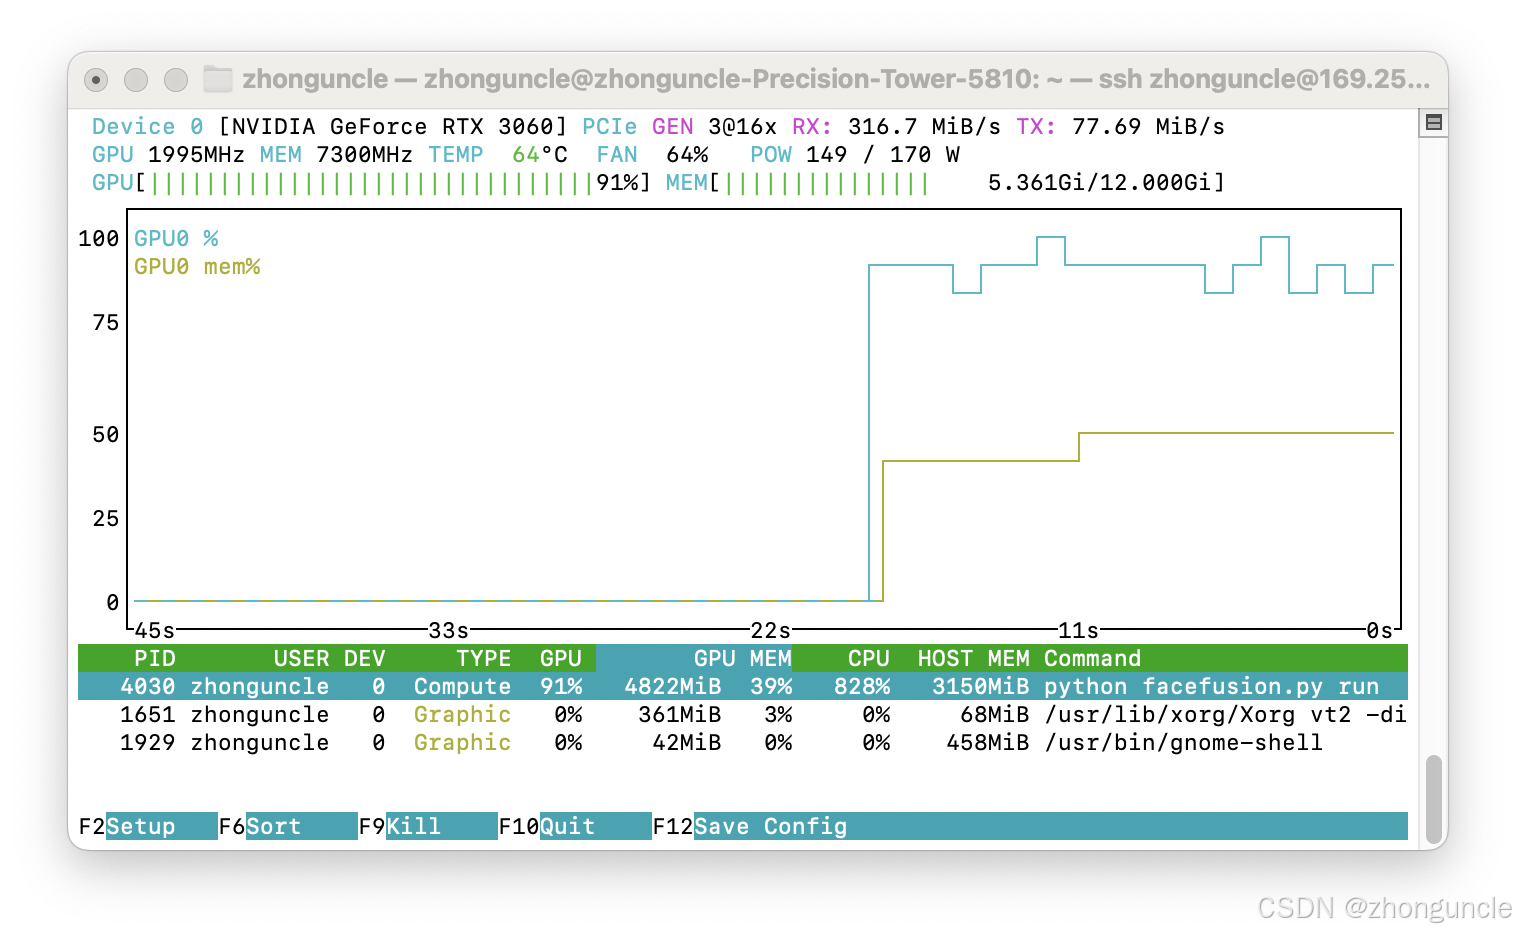
The frequency is now 1995 MHz and power consumption is 149W.
To modify the power limit, use -pl:
$ sudo nvidia-smi --id=GPU-037a6092-3f62-5b68-ac66-856918216320 -pl 120
Power limit for GPU 00000000:03:00.0 was set to 120.00 W from 170.00 W.
All done.
However, the frequency may become unstable at this point. If you set a value outside the valid range, you’ll get a warning:
$ sudo nvidia-smi --id=GPU-037a6092-3f62-5b68-ac66-856918216320 -pl 200
Provided power limit 200.00 W is not a valid power limit which should be between 100.00 W and 187.00 W for GPU 00000000:03:00.0
Terminating early due to previous errors.
As shown, the valid power range is
between 100.00 W and 187.00 W.
With this method, reducing power limit almost always lowers frequency. In the next section, we’ll cover undervolting, which lets you reduce power consumption while maintaining or even improving performance.
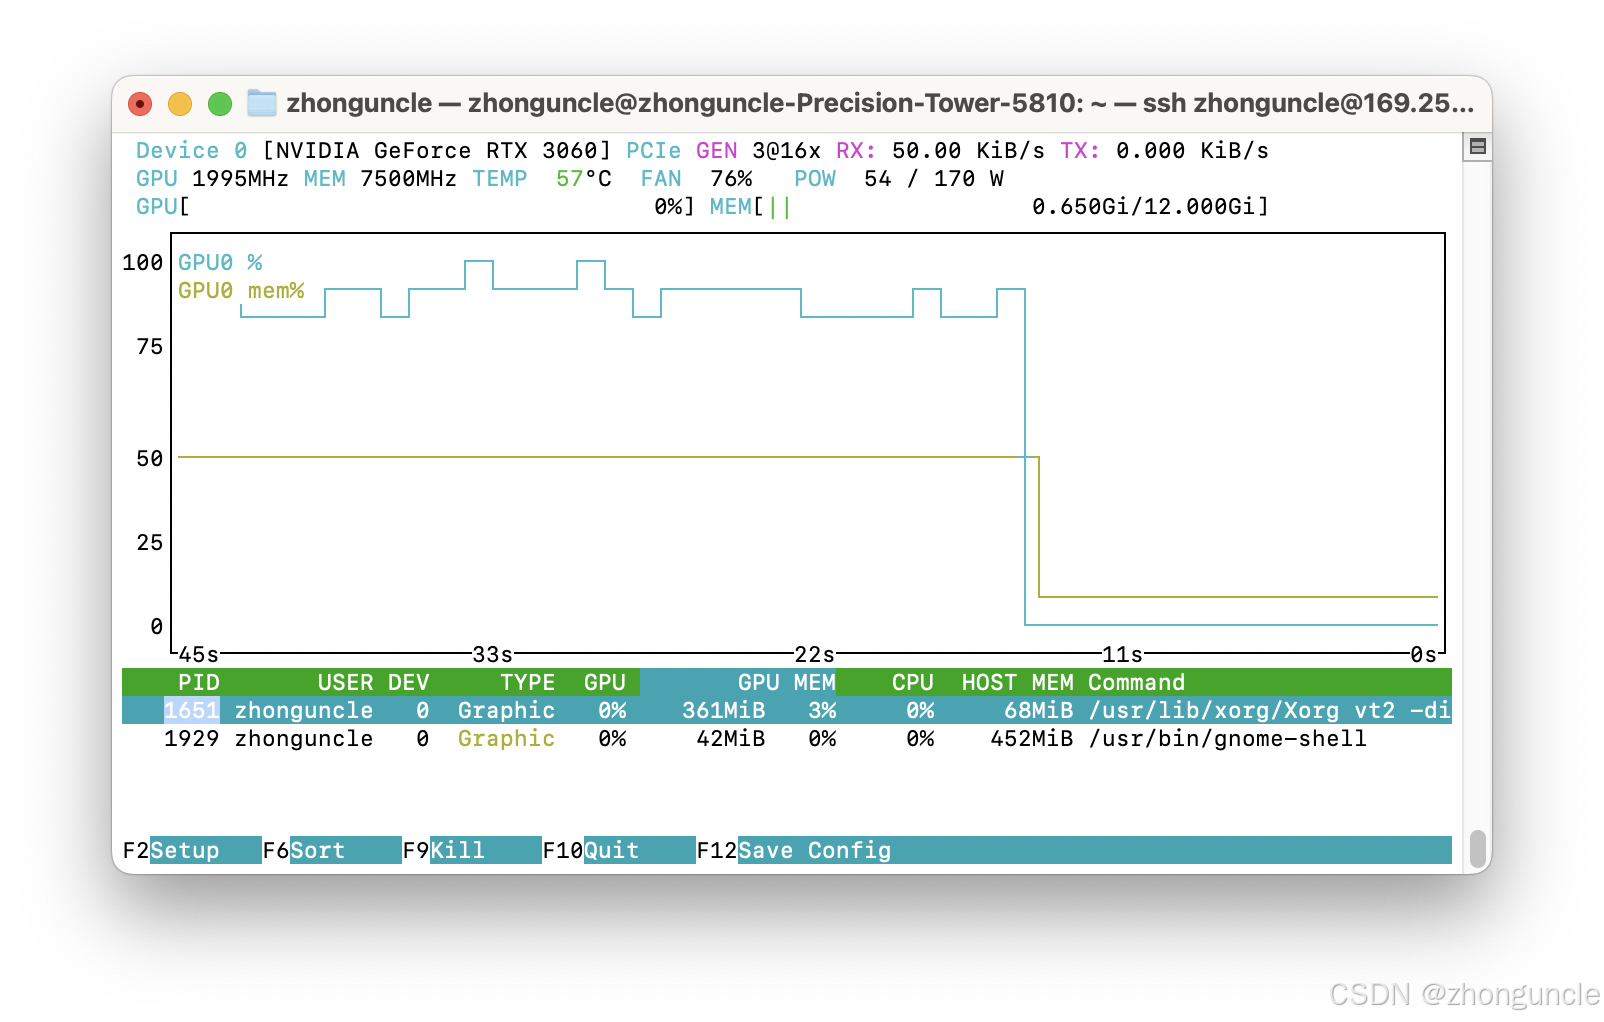
Additionally, with fixed frequency settings, power consumption remains high even at idle:
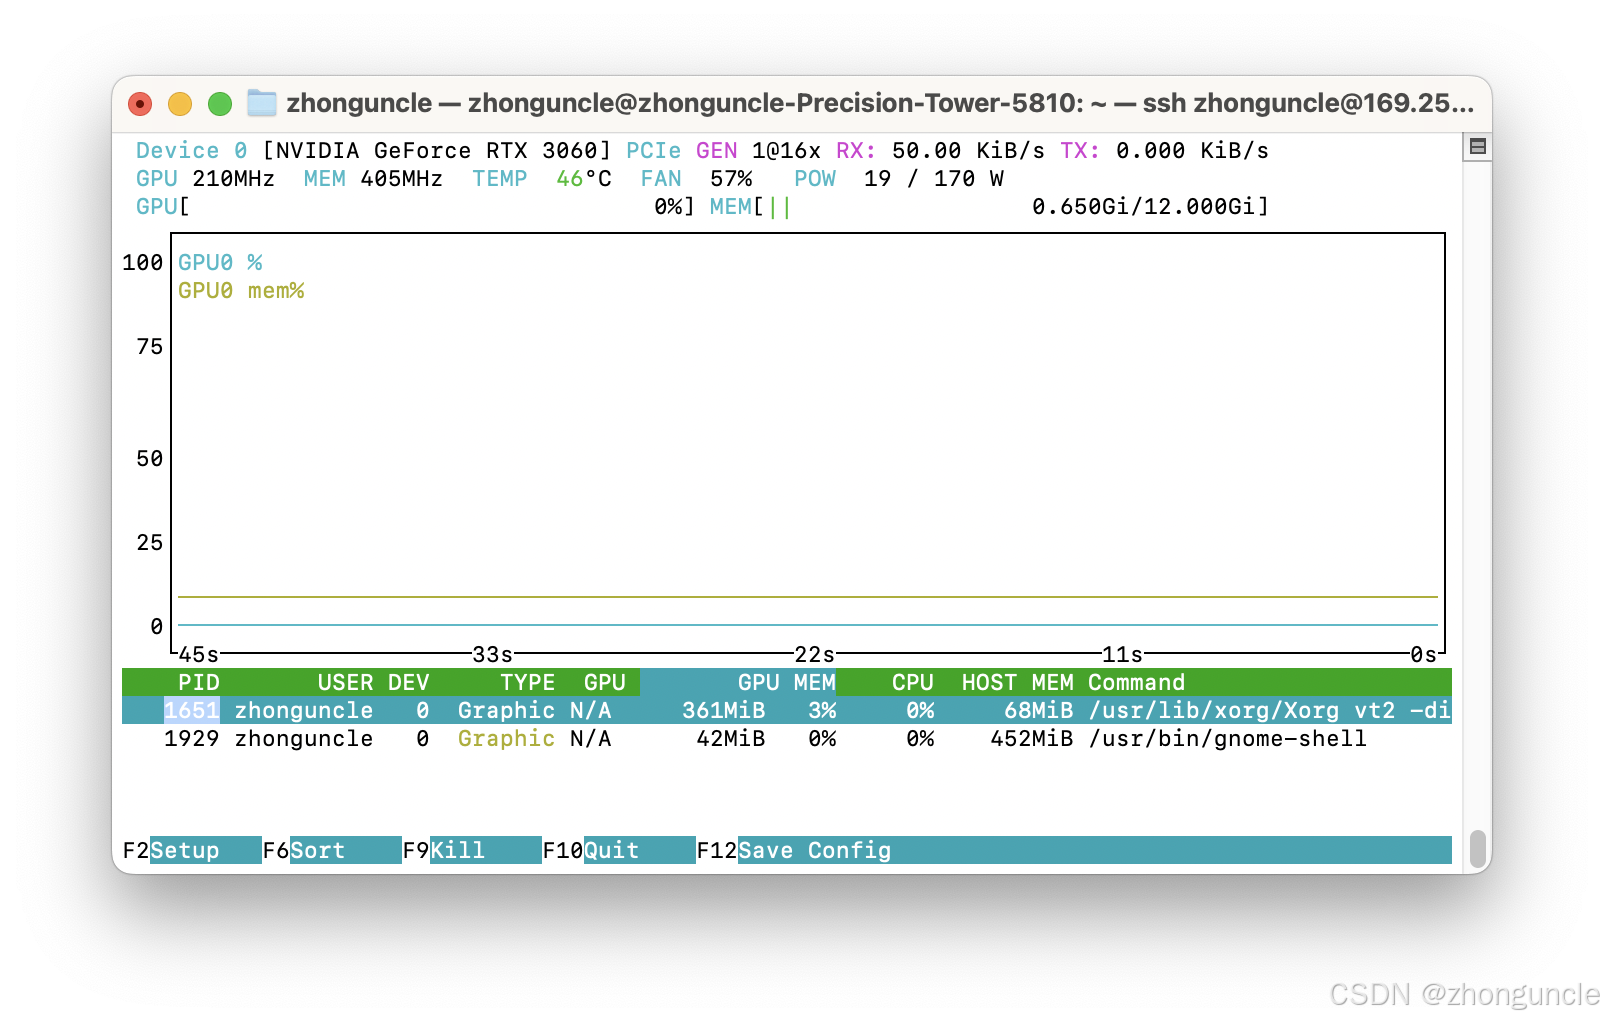
To reset frequencies, use -rgc (reset core clock) and -rmc (reset memory clock):
$ sudo nvidia-smi --id=GPU-037a6092-3f62-5b68-ac66-856918216320 -rgc
All done.
$ sudo nvidia-smi --id=GPU-037a6092-3f62-5b68-ac66-856918216320 -rmc
All done.
Like power limits, core and memory frequencies have predefined ranges. View the full list with:
nvidia-smi --query-supported-clocks=timestamp,gpu_name,gpu_uuid,memory,graphics --format=csv
timestamp, gpu_name, gpu_uuid, memory [MHz], graphics [MHz]
2025/09/09 06:03:42.922, NVIDIA GeForce RTX 3060, GPU-037a6092-3f62-5b68-ac66-856918216320, 7501 MHz, 2190 MHz
2025/09/09 06:03:42.922, NVIDIA GeForce RTX 3060, GPU-037a6092-3f62-5b68-ac66-856918216320, 7501 MHz, 2182 MHz
2025/09/09 06:03:42.922, NVIDIA GeForce RTX 3060, GPU-037a6092-3f62-5b68-ac66-856918216320, 7501 MHz, 2175 MHz
2025/09/09 06:03:42.922, NVIDIA GeForce RTX 3060, GPU-037a6092-3f62-5b68-ac66-856918216320, 7501 MHz, 2167 MHz
....
This maximum core frequency is essentially the highest sustainable value (though this may be specific to my RTX 3060—feel free to test higher values).
Undervolting and Overclocking (Python/pynvml)
Next, we’ll cover undervolting and overclocking.
We’ll use Python for this, as NVIDIA doesn’t provide a command-line API for undervolting.
Important note: We’ll use root privileges, so proceed carefully and test incrementally. Avoid large adjustments to prevent irreversible damage. Since we’re using NVML, you can also write a C/C++ version and compile it to run on startup.
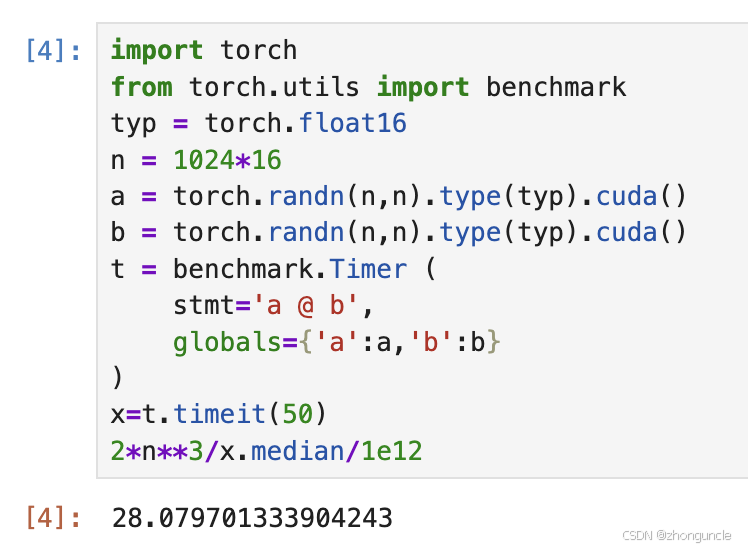
First, the default state:
FP16 benchmark results at this state: 28.08 TFLOPS:
Checking voltage with nvidia-smi -q -d VOLTAGE shows around 1050 mV.
Install nvidia-ml-py (using Python’s pip—Python environments can be tricky!):
$ sudo python -m pip install nvidia-ml-py
Requirement already satisfied: nvidia-ml-py in /usr/local/lib/python3.10/dist-packages (13.580.65)
WARNING: Running pip as the 'root' user can result in broken permissions and conflicting behaviour with the system package manager. It is recommended to use a virtual environment instead: https://pip.pypa.io/warnings/venv
Or install via apt:
sudo apt install python3-pynvml
Ignore the warning—we intentionally use root for this operation.
Create a script to dynamically adjust frequency (+100MHz), set a fixed power limit (-30W), and tweak voltage:
I recommend reading the full section before running this script.
from pynvml import *
# Initialize NVML
nvmlInit()
GPU = nvmlDeviceGetHandleByIndex(0)

# Set core clock offset to +100 MHz
nvmlDeviceSetGpcClkVfOffset(GPU, 100)
# Set memory clock offset to 0 MHz
nvmlDeviceSetMemClkVfOffset(GPU, 0)
# Set power limit to 140 W (140000 mW)
nvmlDeviceSetPowerManagementLimit(GPU, 140000)
# Set GpcClk V/F (Voltage/Frequency) curve offset to -200 MHz.
# Unlike MSI Afterburner, we use this to indirectly reduce voltage (explained later).
nvmlDeviceSetGpcClkVfOffset(GPU, 200)

# Shutdown NVML
nvmlShutdown()
Run with sudo or as root:
$ sudo python3 oc.py
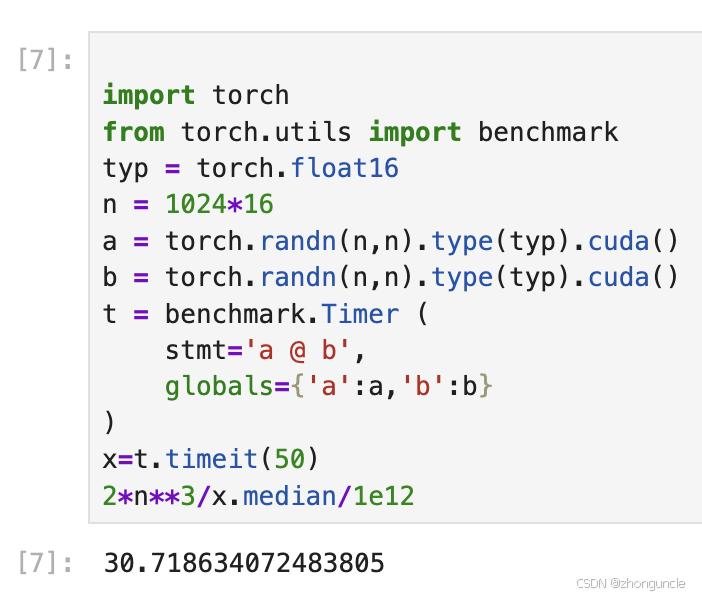
With everything configured, test the results:
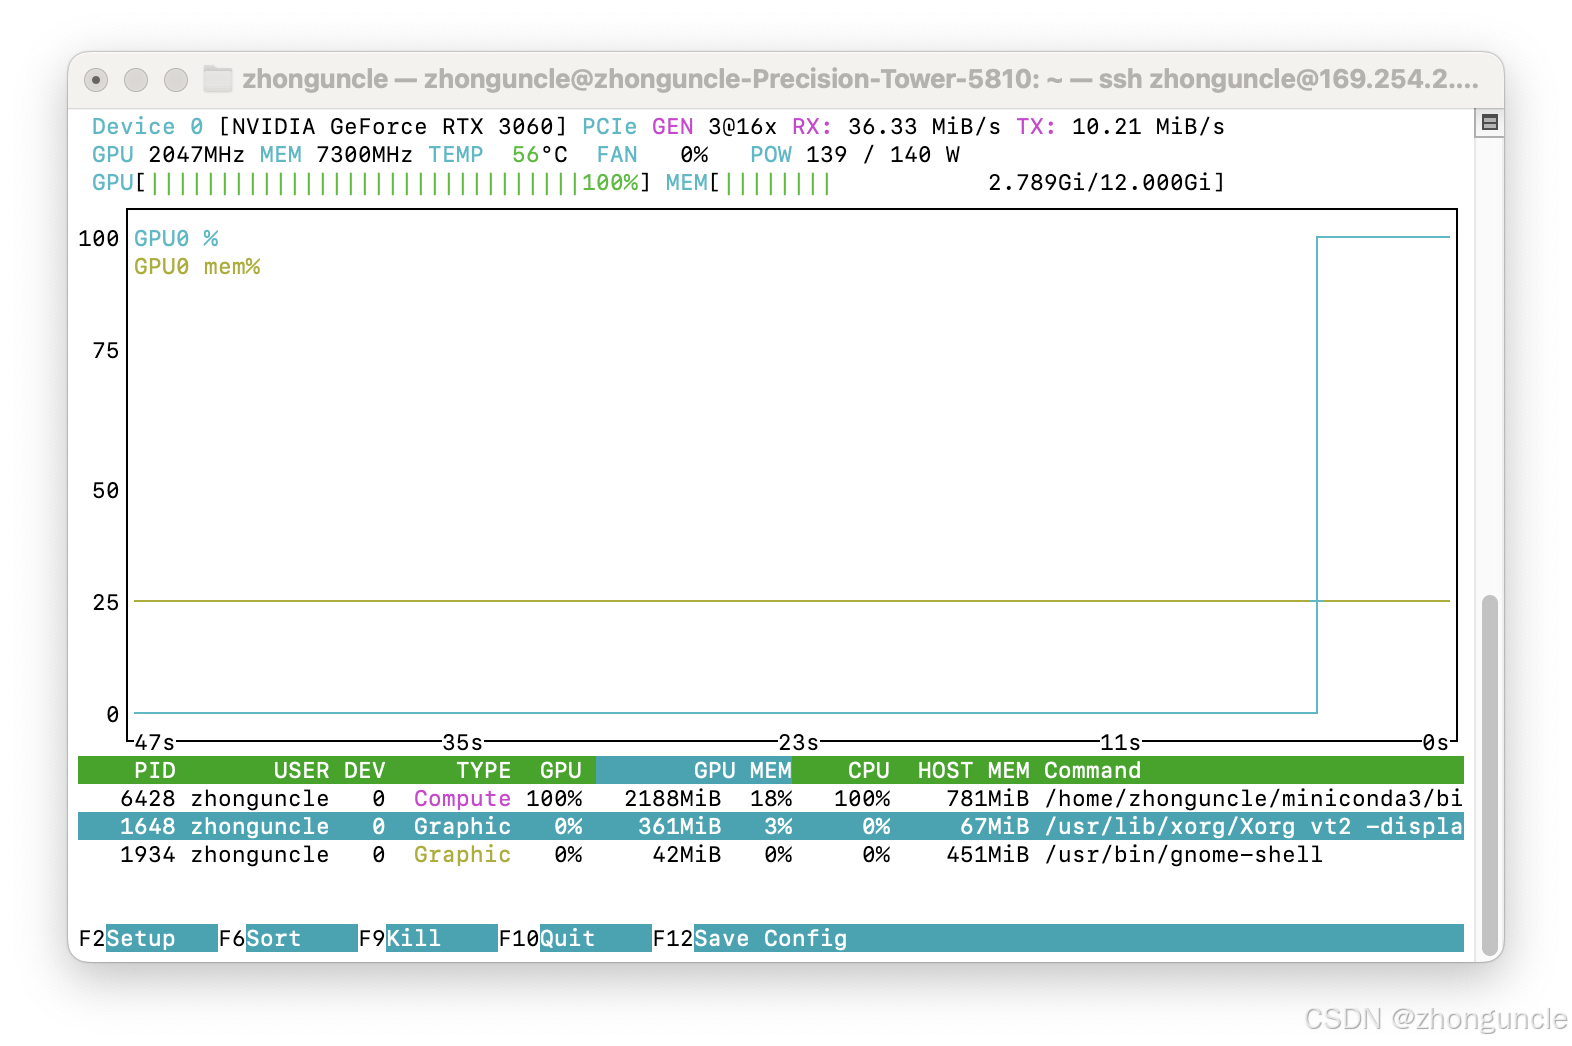
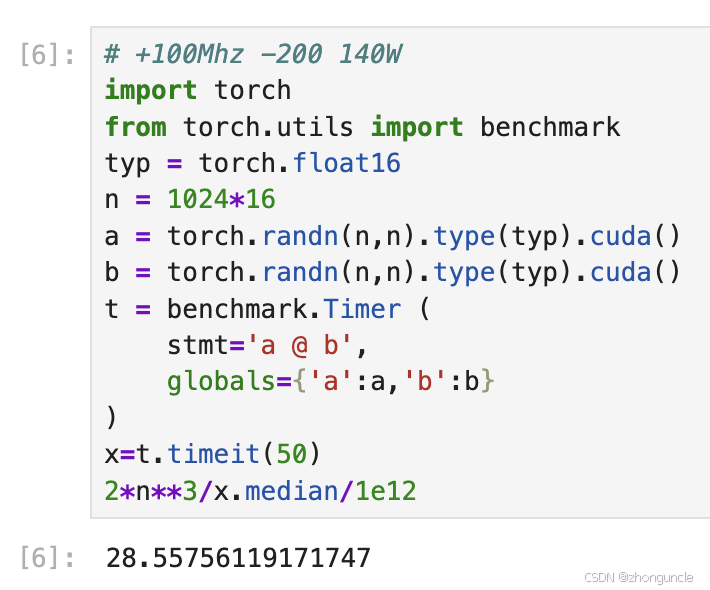
You can see power consumption dropped by 30W while FP16 performance increased by 0.5 TFLOPS.
Let’s explain voltage adjustment in detail.
Explaining nvmlDeviceSetGpcClkVfOffset
nvmlDeviceSetGpcClkVfOffset(GPU, 200) adjusts the GpcClk V/F (Voltage/Frequency) curve offset.
GPC (Graphics Processing Cluster) is a core hardware module in modern GPU architectures that manages and schedules key computing resources. The GpcClk V/F curve is the foundation of Boost technology. When GPU load increases, the driver automatically raises GpcClk and adjusts voltage to reach Boost frequency.
If frequency is fixed, reducing this ratio lowers voltage—right?
First, we need to understand the unit of this offset value.
Through testing, I found this value represents a “frequency reduction”. For example, setting it to 100 means the voltage used at the current frequency is the same as the default voltage at -100 MHz.
Let’s verify this:
- Force the frequency to 2000 MHz using the method from Section 1
- Monitor real-time frequency and voltage in a new window:
$ watch -n 1 'echo "Core Frequency:"; nvidia-smi -q -d CLOCK | grep "Graphics"; echo "Voltage:"; nvidia-smi -q -d VOLTAGE | grep "Graphics"'
- With
nvmlDeviceSetGpcClkVfOffset(GPU, 0): Voltage at 2000 MHz is 1081.250 mV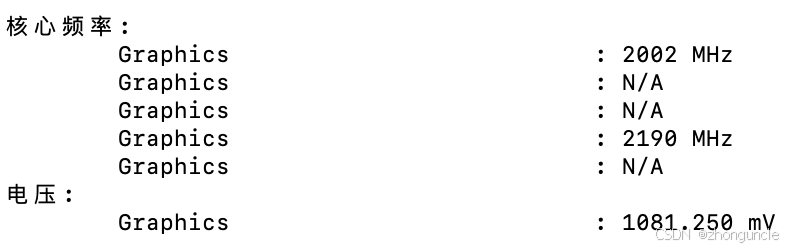
- With
nvmlDeviceSetGpcClkVfOffset(GPU, 100): Voltage at 2000 MHz drops to 1012.500 mV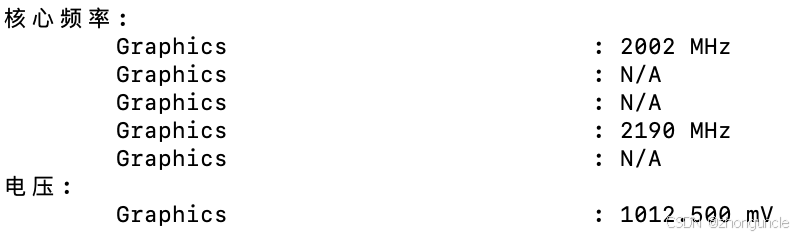
- Reset offset to
0but set frequency to 1900 MHz: Voltage is 1012.500 mV (same as above!)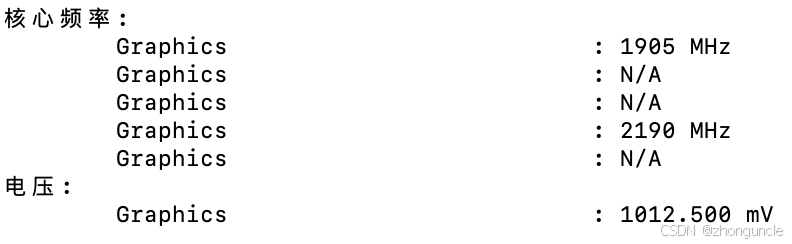
- Compare
nvmlDeviceSetGpcClkVfOffset(GPU, 200)(2000 MHz) with 1800 MHz (0 offset): Both show ~950 mV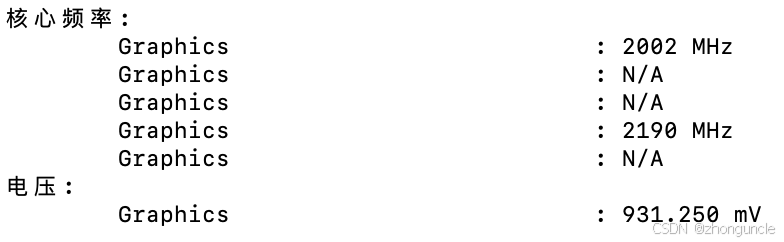
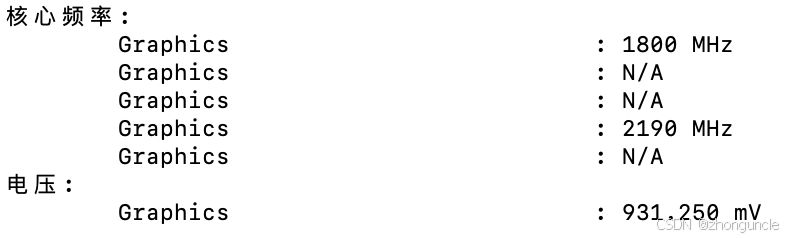
Confirmed!
Precautions
After setting the offset, voltage is no longer constant—since frequency dynamically changes.
Even with forced frequency settings, ensure sufficient power headroom; otherwise, the GPU will throttle.
Also monitor temperature: hitting the temperature threshold will cause throttling (this threshold can be adjusted).
If you encounter errors like this during FP16 benchmarking, your settings are unstable:
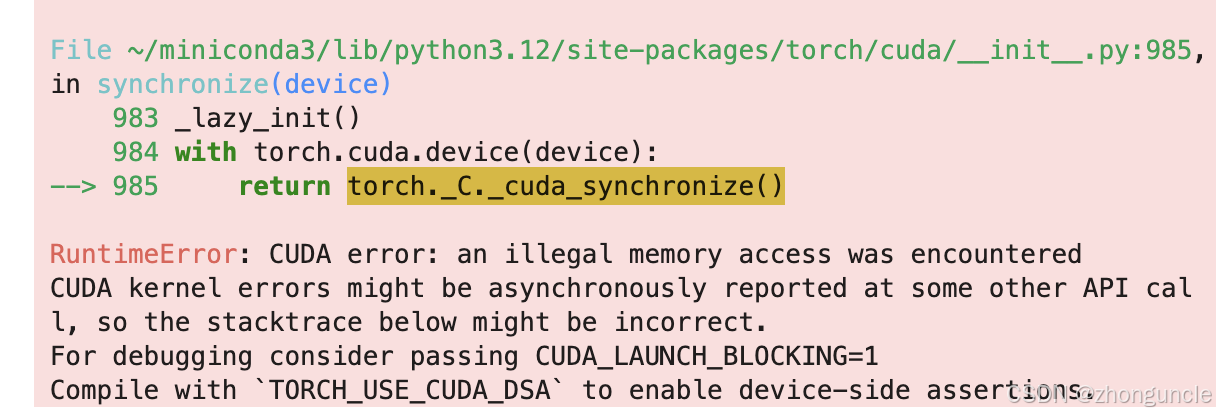
Simply restart the Jupyter kernel (no system reboot needed). Failing to restart will cause persistent errors regardless of subsequent adjustments.
Adjustment Strategies
For best results, combine the two methods described above.
First, decide whether to prioritize performance or power efficiency.
Power Efficiency (Undervolting + Overclocking)
To maintain performance while reducing power consumption:
- Force maximum frequency near the default Boost frequency (or slightly lower)
- Adjust
nvmlDeviceSetGpcClkVfOffsetto reduce power consumption significantly
Example for my GPU:
sudo nvidia-smi --id=GPU-037a6092-3f62-5b68-ac66-856918216320 -lgc 200,2100
Then set power limit and voltage via Python:
# Set power limit to 140 W (140000 mW)
nvmlDeviceSetPowerManagementLimit(GPU, 140000)
# Set GpcClk V/F curve offset (indirect voltage reduction)
nvmlDeviceSetGpcClkVfOffset(GPU, 200)
Setting frequencies via command line is more stable than adjusting offsets directly in Python.
This setup saves 30W of power—about 0.7 kWh per day at full load (and lowers temperatures too!). Higher-power GPUs will save even more energy.
Performance (Overclocking)
For pure performance gains:
- Expand frequency range
- Adjust
nvmlDeviceSetGpcClkVfOffsetto optimize voltage
From the supported clocks list, my GPU’s maximum frequency is 2190 MHz:
$ sudo nvidia-smi --id=GPU-037a6092-3f62-5b68-ac66-856918216320 -lgc 200,2190
Running at this frequency will hit the power limit—raise it to maximum (187W). However, even maximum power can’t sustain peak frequency, so reduce voltage incrementally. Here’s my stable configuration:
nvmlDeviceSetPowerManagementLimit(GPU, 187000)
nvmlDeviceSetGpcClkVfOffset(GPU, 170)
This delivers a 7.8% performance increase with a 10% (17W) power consumption increase.
I hope these tips help anyone who needs them!
Quick Reference
Command Line:
- Adjust core frequency:
sudo nvidia-smi --id=[id] -lgc [min_freq],[max_freq] - Adjust memory frequency:
sudo nvidia-smi --id=[id] -lmc [min_freq],[max_freq] - Reset core frequency:
sudo nvidia-smi --id=[id] -rgc - Reset memory frequency:
sudo nvidia-smi --id=[id] -rmc - Enable persistence mode:
sudo nvidia-smi --id=[id] -pm 1 - Set power limit:
sudo nvidia-smi --id=[id] -pl [power_limit]
Python: Dynamic frequency adjustment (+100MHz), fixed power reduction (-30W), and voltage tuning:
Still recommend reading the full explanation first!
from pynvml import *
# Initialize NVML
nvmlInit()
GPU = nvmlDeviceGetHandleByIndex(0)

# Set core clock offset to +100 MHz
nvmlDeviceSetGpcClkVfOffset(GPU, 100)
# Set memory clock offset to 0 MHz
nvmlDeviceSetMemClkVfOffset(GPU, 0)
# Set power limit to 140 W (140000 mW)
nvmlDeviceSetPowerManagementLimit(GPU, 140000)
# Set GpcClk V/F (Voltage/Frequency) curve offset to -200 MHz
nvmlDeviceSetGpcClkVfOffset(GPU, 200)

# Shutdown NVML
nvmlShutdown()
References/Further Reading
- 5.18. Device Commands - NVML API: NVML API documentation (where I found the voltage adjustment method). Note: NVIDIA mentions deprecated APIs—my driver version may be too old for the new ones.
- How do I reset NVIDIA GPU power management settings using NVML? - Massed Compute: Learned Python-based adjustment methods here.
- ASUS V/F Point Offset - SkatterBencher: Explains ASUS CPU V/F point offset (contains useful V/F curve concepts).
- Voltage Frequency Curve - NVIDIA GeForce RTX 5080 Founders Edition Review - TechPowerUp: Shows RTX 5080 V/F curves and clock/voltage relationships.
For GPU power management research, check these papers: