FFmpeg CUDA Hardware-Accelerated Transcoding on Ubuntu
This article uses an Ubuntu environment. The version of FFmpeg installed directly via APT on Ubuntu supports CUDA acceleration. This demonstration uses this pre-installed version—your experience may vary if you compile FFmpeg yourself or install it from other sources.
For an introduction to FFmpeg and hardware acceleration on macOS, see Convert MKV to MP4 on macOS with FFmpeg: A Hardware-Accelerated Guide - ZhongUncle GitHub Pages.
If you’re already familiar with the transcoding process, skip the first two sections and jump directly to the “Using FFmpeg for Hardware-Accelerated Transcoding” section via the sidebar to view the commands.
Transcoding Workflow (Differences Between Decoding, Encoding, and Transcoding)
Any transcoding process consists of two steps: decoding and encoding. Simply put, decoding converts a video file into a displayable video stream, while encoding converts a video stream into a video file.
Here are two examples to illustrate decoding and encoding:
- Camera: A camera encodes signals from its sensor into a specific video format. This makes streaming or storage easier, as it decouples the data from the sensor’s proprietary signal format.
- Video playback: Playing a video involves decoding the transmitted video format into a specific signal, which is then sent to a display or other device for you to watch.
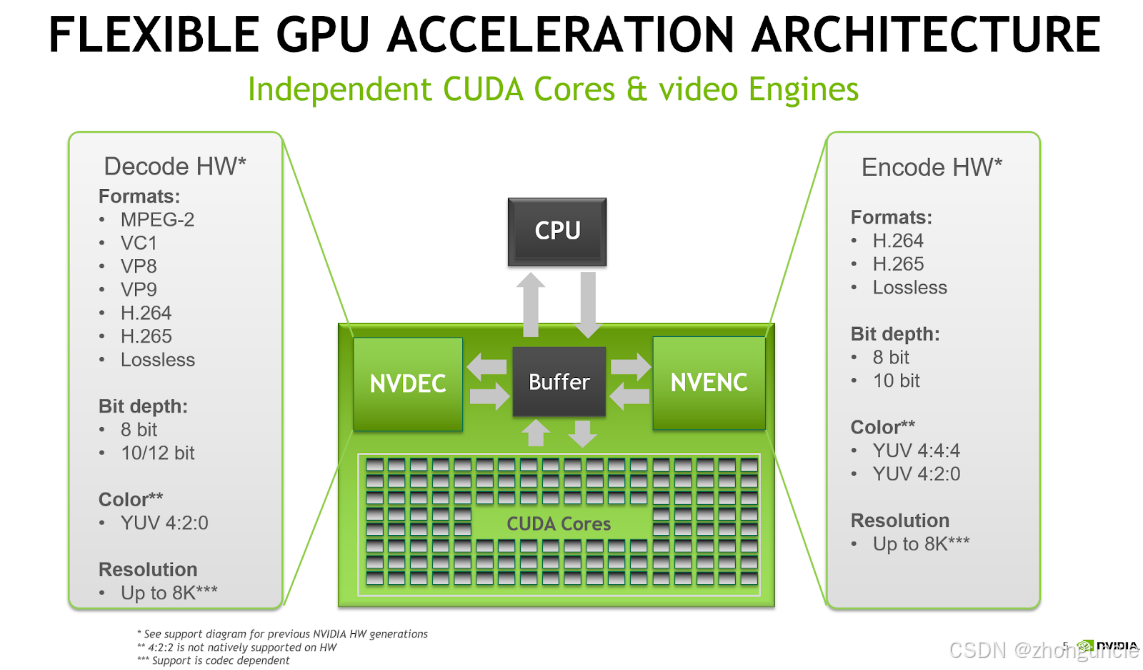
By default, FFmpeg uses software decoding and encoding without any special options. Hardware-accelerated decoding/encoding leverages dedicated chips designed for specific formats—offering faster performance and lower power consumption compared to general-purpose CPUs.
General knowledge: Purpose-built hardware chips are much faster and more power-efficient than CPU-based software processing.
Differences Between Software and Hardware Decoding/Encoding
Software decoding/encoding uses the CPU to run specialized software that handles the decoding/encoding process. The main advantage is flexibility—support for new formats or custom encodings can be added via software updates. In contrast, hardware encoding/decoding is hardwired into the chip during manufacturing and cannot be modified. Typically, each new generation of hardware adds support for additional formats. For example:
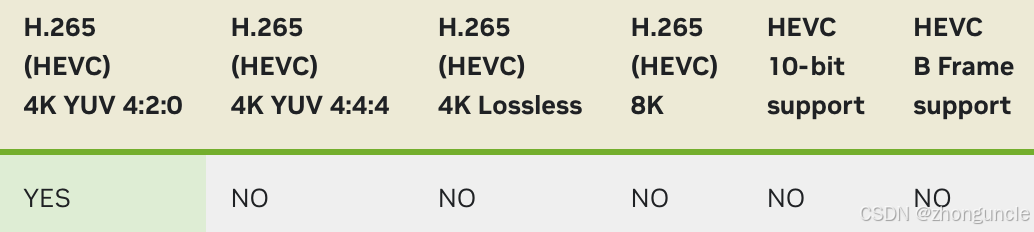
- The 980 Ti’s encoder only supports 4:2:0 4K H.265:
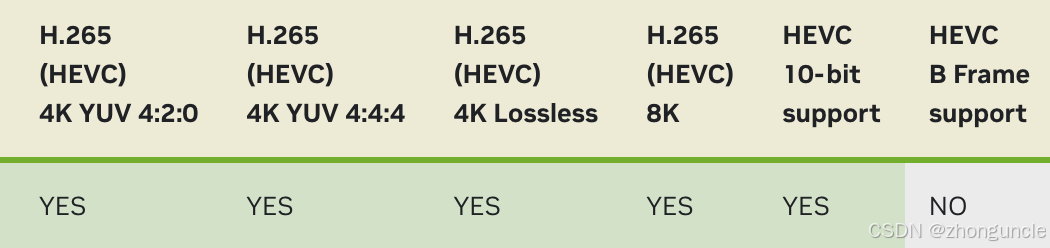
- The 1080 Ti added support for three more formats:
Important note: While video codecs are often bundled with GPUs, they are separate from CUDA or rasterization units. For example, high-performance GPUs like the Tesla A100 do not support hardware encoding/decoding because they lack dedicated codec chips (though not all data center GPUs are this way—e.g., the V100 and P100 include them).

Additionally, hardware codecs have limited capacity—processing 10 videos simultaneously will not be as fast as processing one. This phenomenon is demonstrated later in the article.
Using FFmpeg for Hardware-Accelerated Transcoding
Simple Start
Now that you understand the basics, let’s start transcoding. Below is the simplest command:
ffmpeg -c:v h264_cuvid -i input.mp4 -c:v h264_nvenc output.mp4
Explanation:
-c:v h264_cuvid: Specifies the hardware decoder (CUDA-accelerated H.264 decoder). Unlike macOS hardware acceleration, FFmpeg requires explicit decoder specification on Ubuntu (see the next section for what happens if you omit this).-c:v h264_nvenc: Specifies the hardware encoder (NVIDIA NVENC H.264 encoder).
Note: This usage differs from the official FFmpeg documentation. Following the official command format may cause transcoding issues in practice.
Setting Bitrate and Frame Rate
Using the basic command above may result in changed bitrate or frame rate (e.g., 30fps → 25fps, 6Mbps → 2Mbps). To preserve or customize these parameters:
ffmpeg -c:v h264_cuvid -i input.mp4 -c:v h264_nvenc -b:v 6000k -r 30 output.mp4
Explanation:
-b:v 6000k: Sets the video bitrate to 6000kbps (6Mbps).-r 30: Sets the output frame rate to 30fps.
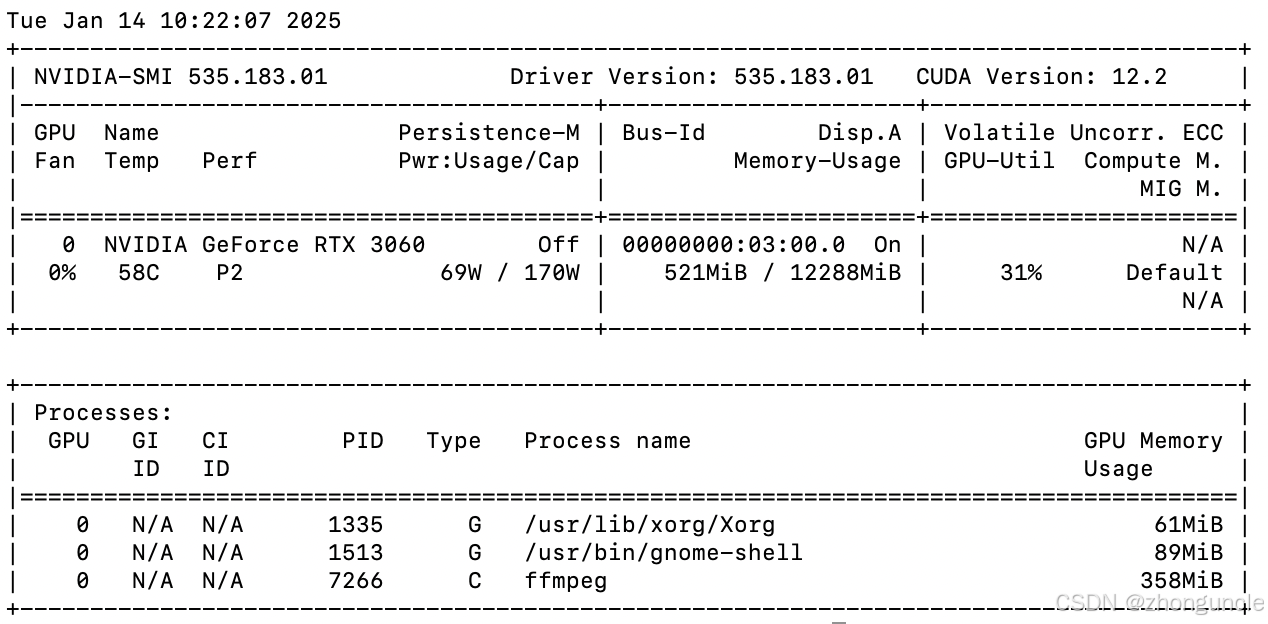
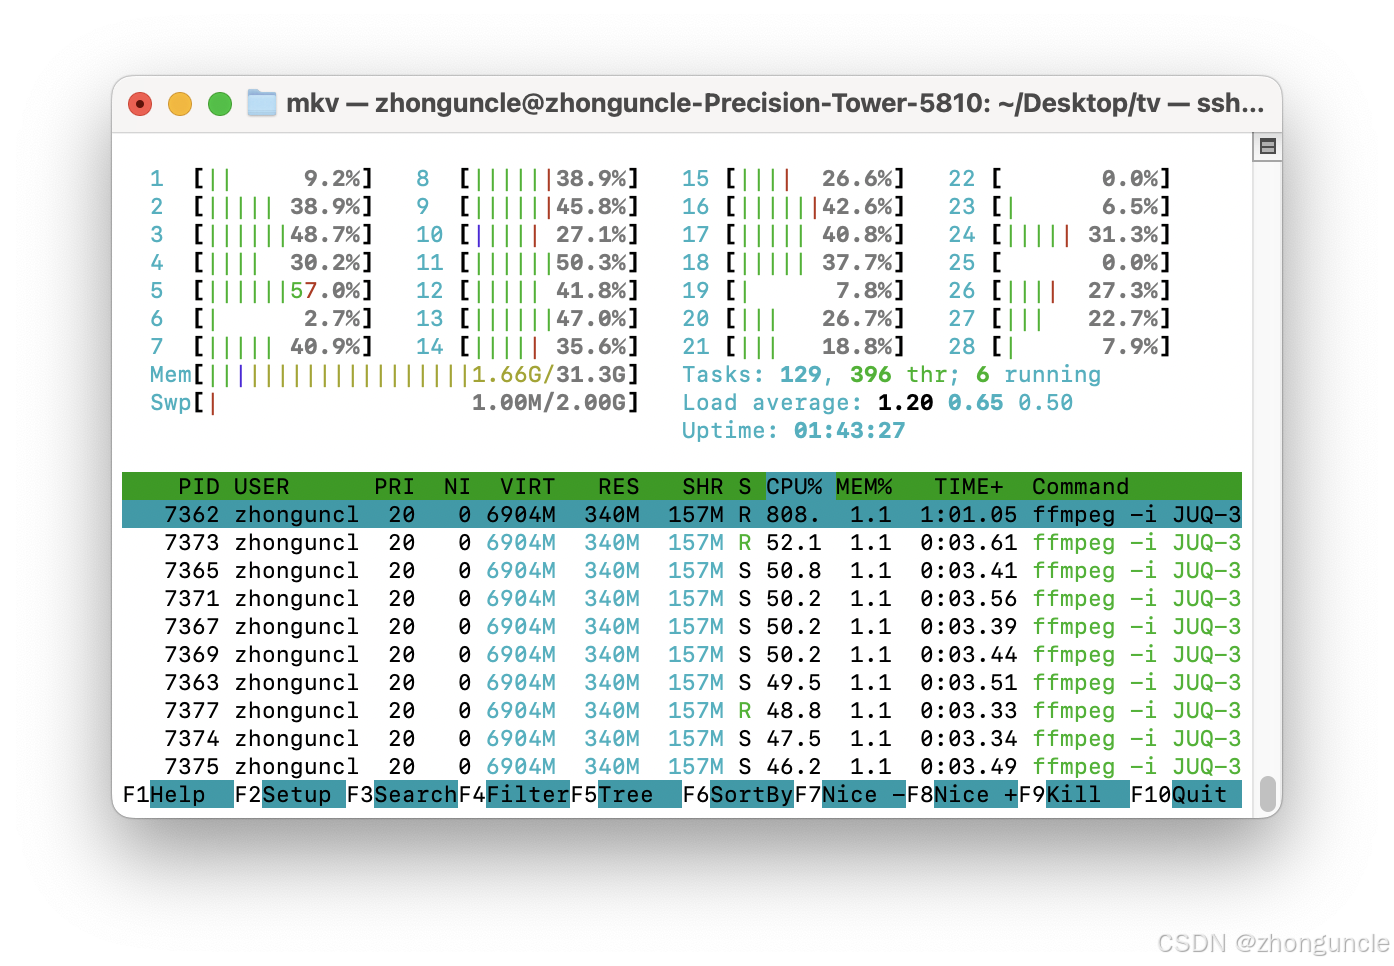
With these settings, the transcoding speed reaches 16x—much faster than integrated GPU acceleration. The GPU utilization during transcoding is shown below:
What Happens If You Omit the Hardware Decoder?
As mentioned earlier, FFmpeg requires explicit hardware decoder specification. If you omit it, FFmpeg will use CPU-based software decoding—resulting in high CPU usage but similar transcoding speed (sometimes slightly faster):
Software decoding has its use cases: When repairing corrupted video encodings, software decoders are more likely to correctly handle damaged files than hardware decoders. For example, I had a video that failed to play after the 11-minute mark in some players. Using the hardware decoder resulted in the following error:
[h264_cuvid @ 0x55ed4090d540] cuvid decode callback error
Error while decoding stream #0:0: Generic error in an external library
The transcoded video was black. However, omitting the hardware decoder (using software decoding) allowed successful transcoding.
What Happens When Running Multiple Jobs on a Single Encoder?
As noted earlier, hardware codecs have limited capacity—processing multiple videos simultaneously does not scale linearly. For example, the 3060 achieves 16x speed for a single transcoding job. Running two jobs simultaneously results in a combined speed of roughly 16x:

This may seem disappointing, but consider practical use cases: Live streaming and recording only require 1x speed. With 16x total capacity, you could theoretically run up to 16 concurrent streams (fewer in practice, as workloads vary—always leave a buffer). This is still a significant advantage for multi-tasking.
Encoding Quality
FFmpeg
Transcoding is typically used to change the video codec (e.g., H.265 → H.264) or file format. Transcoding between the same codec and format is less common, but tests show the quality is excellent—nearly indistinguishable from software transcoding.
In my previous blog about macOS FFmpeg hardware acceleration, I compared hardware transcoding (QSV) when converting MP4 to MOV and reducing the bitrate from 42Mbps to 10Mbps:

Results with CUDA hardware transcoding (3060):
The 3060’s NVENC encoder delivers better quality than the 8th-gen Intel QSV encoder—impressive, though it consumes more power.
OBS
Hardware encoders have a supported bitrate range—exceeding or falling below this range results in significant quality loss or encoding issues.
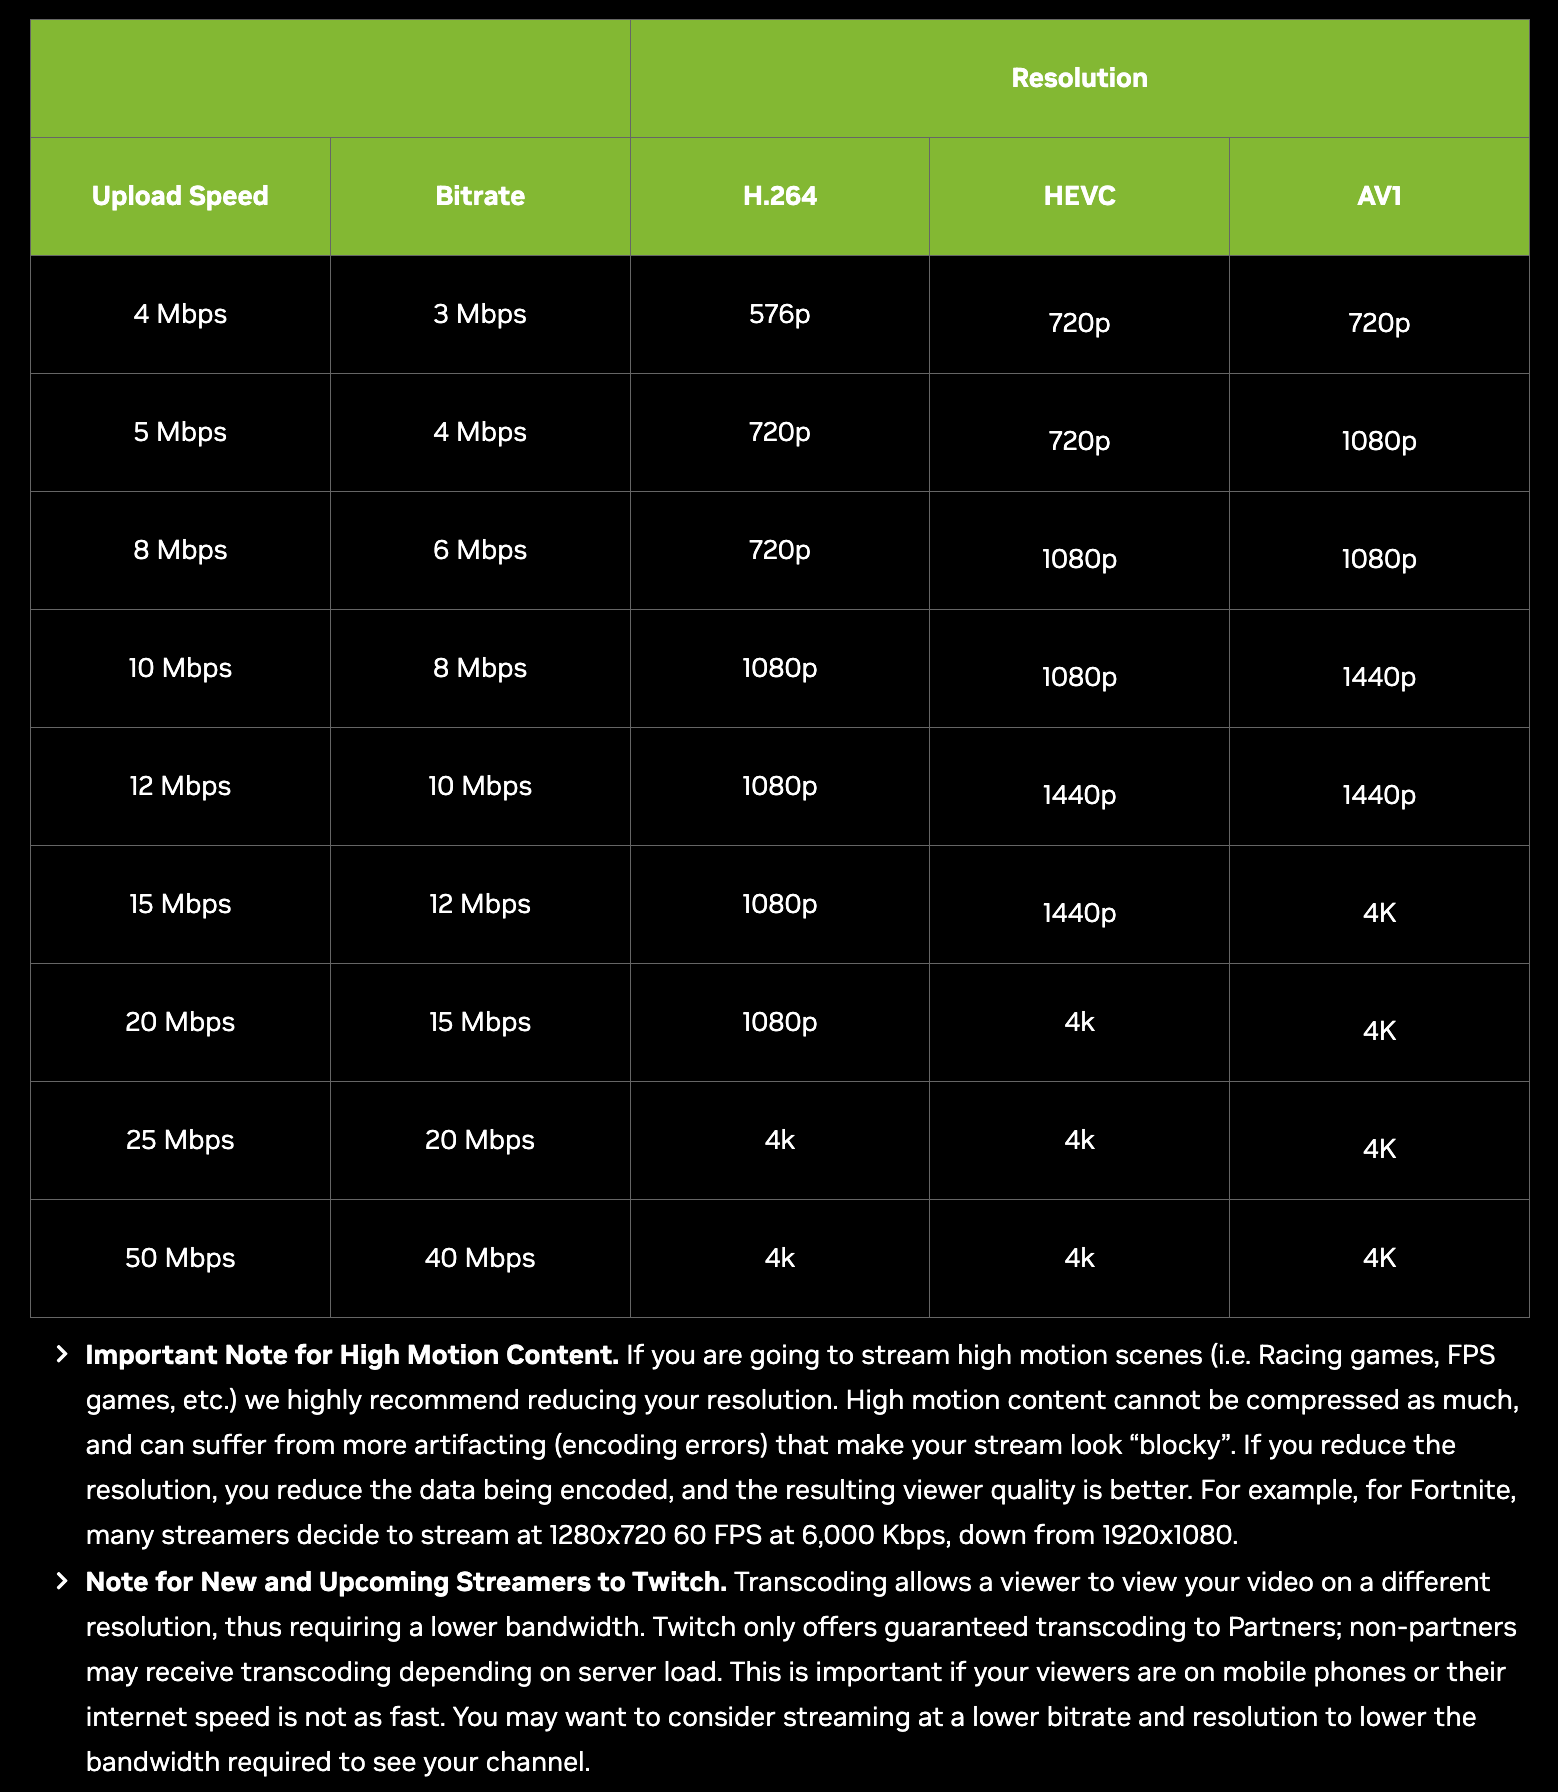
NVIDIA’s official recommended OBS streaming settings (resolution, bitrate, frame rate) are shown below:
When playing Where Winds Meet, recording with OBS using NVENC H.264 encoding at 8000kbps produced quality nearly identical to software encoding. At 40Mbps, the quality was slightly lower but still acceptable. I’ll cover this in more detail in a separate blog—previously, I used an NVIDIA MX250 GPU, whose encoding speed and quality were much worse than QSV. Below are quick screenshots:
I used custom settings based on personal preference, not NVIDIA’s official recommendations (I was unaware of the official guidelines initially).
Scenes with dense objects (like wheat fields) are ideal for testing bitrate loss (colorful scenes also work well). As shown below, individual wheat ears are indistinguishable, but the overall image remains clear from a distance (the images below are re-compressed but still demonstrate acceptable quality):


I hope these will help someone in need~
References/Further Reading
- NVIDIA FFmpeg Transcoding Guide - Nvidia Developer Technical Blog: Technical introduction to CUDA-accelerated transcoding in FFmpeg.
- Using FFmpeg with NVIDIA GPU Hardware Acceleration: Official documentation for CUDA-accelerated encoding/decoding in FFmpeg.
- Video Encode and Decode GPU Support Matrix - Nvidia Developer: Check which codecs are supported by your GPU.
- NVIDIA NVENC OBS Guide - Nvidia: Nvidia’s guide to live streaming with OBS.
- Broadcasting 101: A Beginner’s Guide to Live Streaming: Covers streaming hardware requirements and additional resources.