How to use Core Image filter (CIFilter) to process photos in SwiftUI
Apple provides 14 major categories, a total of 174 image processing methods and some common filters in the Core Image API. Some of the filters can also process videos or even real-time videos. For details on each filter, see: [Core Image Filter Reference] (https://developer.apple.com/library/archive/documentation/GraphicsImaging/Reference/CoreImageFilterReference/index.html#//apple_ref/doc/filter/ci/CIColorClamp)
The first is how to read this web page, that is to say what information this web page provides, which is very helpful for us when using it. Take the screenshot below as an example to explain how to see it.
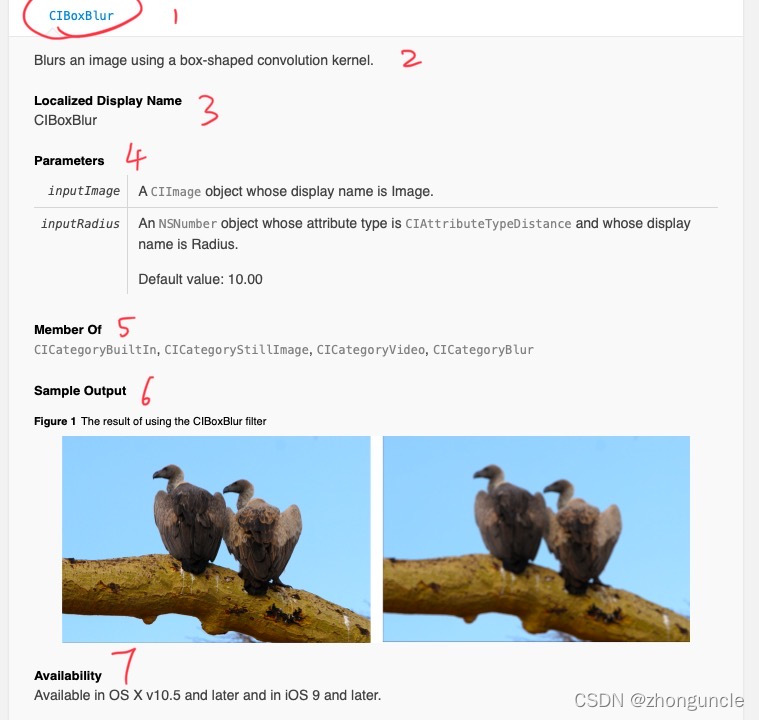
Introduced according to each part:
- Filter name. In general, it is the same as the local name in part 3.
- Introduction to filter function. Here it is “Blurring an image using a box convolution kernel”.
- This is the local display name, which is the name we need to use when calling the filter in the code.
- Parameters and parameter introduction. This is some information we need to tell the code when calling the filter. For example, the inputImage here is the input image. Almost every filter will have this parameter. The inputRadius here is the degree of blur of the filter. If we don’t make adjustments, the default value is 10.00. The parameters of different filters are different, so you need to check them when using them. When using it, the name needs to be deformed, and kCI- and -Key need to be added. This will be explained in detail later when using it.
- This part is the category to which the filter belongs. When looking at the web page, you can find that Apple divides it into multiple categories. We can find similar ones by looking at the categories here. But we will find that some major categories here are no longer there. It may be that Apple has deleted and adjusted some filters and major categories, but the ones under each filter have not been adjusted.
- Effects of using filters. Most filters will have this section to show the effects of use.
- Systems that can use these filters. Since these APIs are very early, they can be used by current devices.
Apple divides it into 17 major categories, as follows:
- CICategoryBlur (blur)
- CICategoryColorAdjustment (color adjustment)
- CICategoryColorEffect (color effects)
- CICategoryCompositeOperation (composite operation)
- CICategoryDistortionEffect (deformation effect)
- CICategoryGenerator (generates, for example, barcode QR codes)
- CICategoryGeometryAdjustment (geometry adjustment)
- CICategoryGradient (gradient)
- CICategoryHalftoneEffect (grid effect)
- CICategoryReduction (simplify pictures)
- CICategorySharpen (sharpen pictures)
- CICategoryStylize (stylized pictures, that is, miscellaneous)
- CICategoryTileEffect (tile effect)
- CICategoryTransition (transition, gradient)
You can find what you need according to your needs.
Next, let’s talk about how to use these officially provided filters (filters or processing methods) in SwiftUI.
First we need to create a function to call the filter API, let’s call the CIBoxBlur just given as an example. The header file is import SwiftUI. I’ve commented almost every line of code to make sure everyone understands it well:
func blurFilter(inputImage: UIImage) -> UIImage {
     //Create a CIContext() to place the processed content
     let context = CIContext()
     //Convert the input UIImage into CIImage
     let inputCIImage = CIImage(image: inputImage)!

     //Create a filter for processing images (Filter)
     let filter = CIFilter(name: "CIBoxBlur")!
     //When setting the value of this setValue, the following forKey parameter follows the transformation of the parameter name given in the document. For example, the official website here gives inputRadius, and kCI- and -Key are the parameters that should be filled in.
     //Set the fuzziness here——You don’t need to write this, it will be as default
     filter.setValue(10, forKey: kCIInputRadiusKey)
     //Set input image
     filter.setValue(inputCIImage, forKey: kCIInputImageKey)

     // Get the filtered image and place it in the CIContext() set at the beginning
     let result = filter.outputImage!
     let cgImage = context.createCGImage(result, from: result.extent)

     //Return the processed image
     return UIImage(cgImage: cgImage!)
}
At this time we can use this filter very simply, as follows:
//Set the input image
let image: UIImage = UIImage(named: "test")!

//Get the output image
let outputImage = blurFilter(inputImage: image)

struct FilterView: View {
     var body: some View {
         Image(uiImage: outputImage)
             .resizable()
     }
}
We can see the processed image displayed on the screen! Let’s deal with the previous screenshot.
The effect is not bad!
Since these APIs are very old, there will be some pitfalls when used with SwiftUI. I searched for a long time but couldn’t find a solution. I only found the solution after doing my own research. But even though it is a very old API, some effects are also outdated, so I think this is useless. They can be nested to create more effects.
To get the photos in the system album, please see: “How to get images from the system album in SwiftUI”.
To call the system camera to take pictures, please see: “How to call the camera in SwiftUI”.
This way we can call the system camera.