How to use the Mac Terminal to develop Raspberry Pi Pico using C/C++
The reason for writing this blog is that the official tutorial is outdated. If you follow the official tutorial to configure on Mac now, you will encounter a lot of problems. I dropped into almost “pits”. Therefore, I record the complete process, as well as the causes and handling methods of various errors. And if I change to new Mac and encounter the same problem in the future, I read this blog to remind how to deal with it.
First, I will record the whole installation process, introduce some background and where the errors occurred. Although some possible errors are introduced in this blog, I still wrote a separate blog to organize them for future reference: Errors and solutions when prepare cross-compilation environment and tool chain (arm-none-eabi-gcc) for Raspberry Pi Pico
Installation
Download Raspberry Pi Pico SDK
The Raspberry Pi Pico SDK provides the header files, libraries and build systems to develop in C/C++ or assembly language for RP2040-based devices, such as Raspberry Pi Pico, which greatly improves development efficiency.
This part is same as the official introducation, but if you use HTTPS cloning and fail many times, please use SSH or update Git to try it. GitHub has HTTPS cloning errors has a brief introduction to this problem.
So both are listed here:
# Use HTTPS
git clone https://github.com/raspberrypi/pico-sdk.git --branch master
# Use SSH
git clone git@github.com:raspberrypi/pico-sdk.git --branch master
Then move to pico-sdk, initialize the referenced submodule:
$ cd pico-sdk
$ git submodule update --init
It may takes long time here, and errors often occur, such as loading failures, connection timeouts, etc. You can try more. This part really requires patience!
Configure Raspberry Pi Pico SDK
Next, you need to add the root of pico-sdk in the environment variable PICO_SDK_PATH, so that later CMake can find some required libraries, header files and other tools. This requires adding below to your Shell configuration file:
export PICO_SDK_PATH=~/Desktop/pico/pico-sdk
Then use source to activate:
$ source .bash_profile
Or reopen the Termiinal window.
We will use some similar operations configure other tools later. If you want to learn more, can read my other blog: How to directly use scripts in Linux (configure all bin directories included in the $PATH variable) .
In addition, although CMake has not been mentioned here, you also can set environment variables by adding below sentence before the project(...) in CMakeLists.txt to set PICO_SDK_PATH:
set(PICO_SDK_PATH ~/Desktop/pico/pico-sdk)
The path above can be wrapped in double quotes or not. Generally, there will be no parsing errors. You can add for safe.
The advantage of this method is easy to set different values for different projects, you can set values you need.
Install CMake
CMake is a tool for building, testing, and packaging, it can generate makefile files that make can build. This is because make is included in all Unix-like systems, but writing makefile files is not easy.
Here we can directly use brew to install:
brew install cmake
To confirm it is installed, use the following command to check the version:
$ cmake --version
cmake version 3.27.1

CMake suite maintained and supported by Kitware (kitware.com/cmake).
Toolchain
Why do need tool chain?
Developing for Raspberry Pi Pico on Mac requires cross-compiling. What is cross-compiling?
Compile a program for another system or even another platform on the system. For example, Here I compile programs for Arm-based Linux on the X86-based macOS. In order to achieve this goal, a set of tools is required for compilation, such as the compiler and library of the target system and target platform. This set of tools is often called as the tool chain.
In local, the compiler clang and libraries are used to compile programs for macOS, the executable program format is the Mach-O executable, cannot run the format in Linux. The final format imported to Raspberry Pi Pico is UF2 firmware image, family Raspberry Pi RP2040.
Download tool chain
The tool chain is arm-none-eabi-gcc. The usage is the same as gcc, but compilation often use CMake, rather than directly use arm-none-eabi-gcc.
It should be noted that when downloading the tool chain, do not use brew. Because the version installed by brew may not be the version for Raspberry Pi Pico or cannot configure correctly, this may cause some errors. For example, the current downloaded version of brew is only 200MB, while the version on the official website is 845MB. If you use the version from brew, then although it is also version 12.3 and no problem with cmake, but when use make will display below errors:
-- Build files have been written to: /shared/pico-setup/pico/pico-examples/build/elf2uf2
[  0%] Performing build step for 'ELF2UF2Build'
Scanning dependencies of target elf2uf2
[ 50%] Building CXX object CMakeFiles/elf2uf2.dir/main.cpp.o
[100%] Linking CXX executable elf2uf2
[100%] Built target elf2uf2
[  0%] No install step for 'ELF2UF2Build'
[  0%] Completed 'ELF2UF2Build'
[  0%] Built target ELF2UF2Build
Use below commands to uninstall and remove the content from brew installation.
# Uninstall arm-none-eabi-gcc
$ brew uninstall arm-none-eabi-gcc
# Remove some according content downloaded
$ brew cleanup arm-none-eabi-gcc
# brew install binary file to /usr/local/bin/ in default. Although have been uninstalled, but maybe have some remaining files. Remove manually
$ sudo rm /usr/local/bin/arm-none-eabi-*
Now we can download from offical website:
Open Arm GNU Toolchain Downloads, use the on-page search function to search for “macOS” because there are so many links. There are so many links just under macOS:
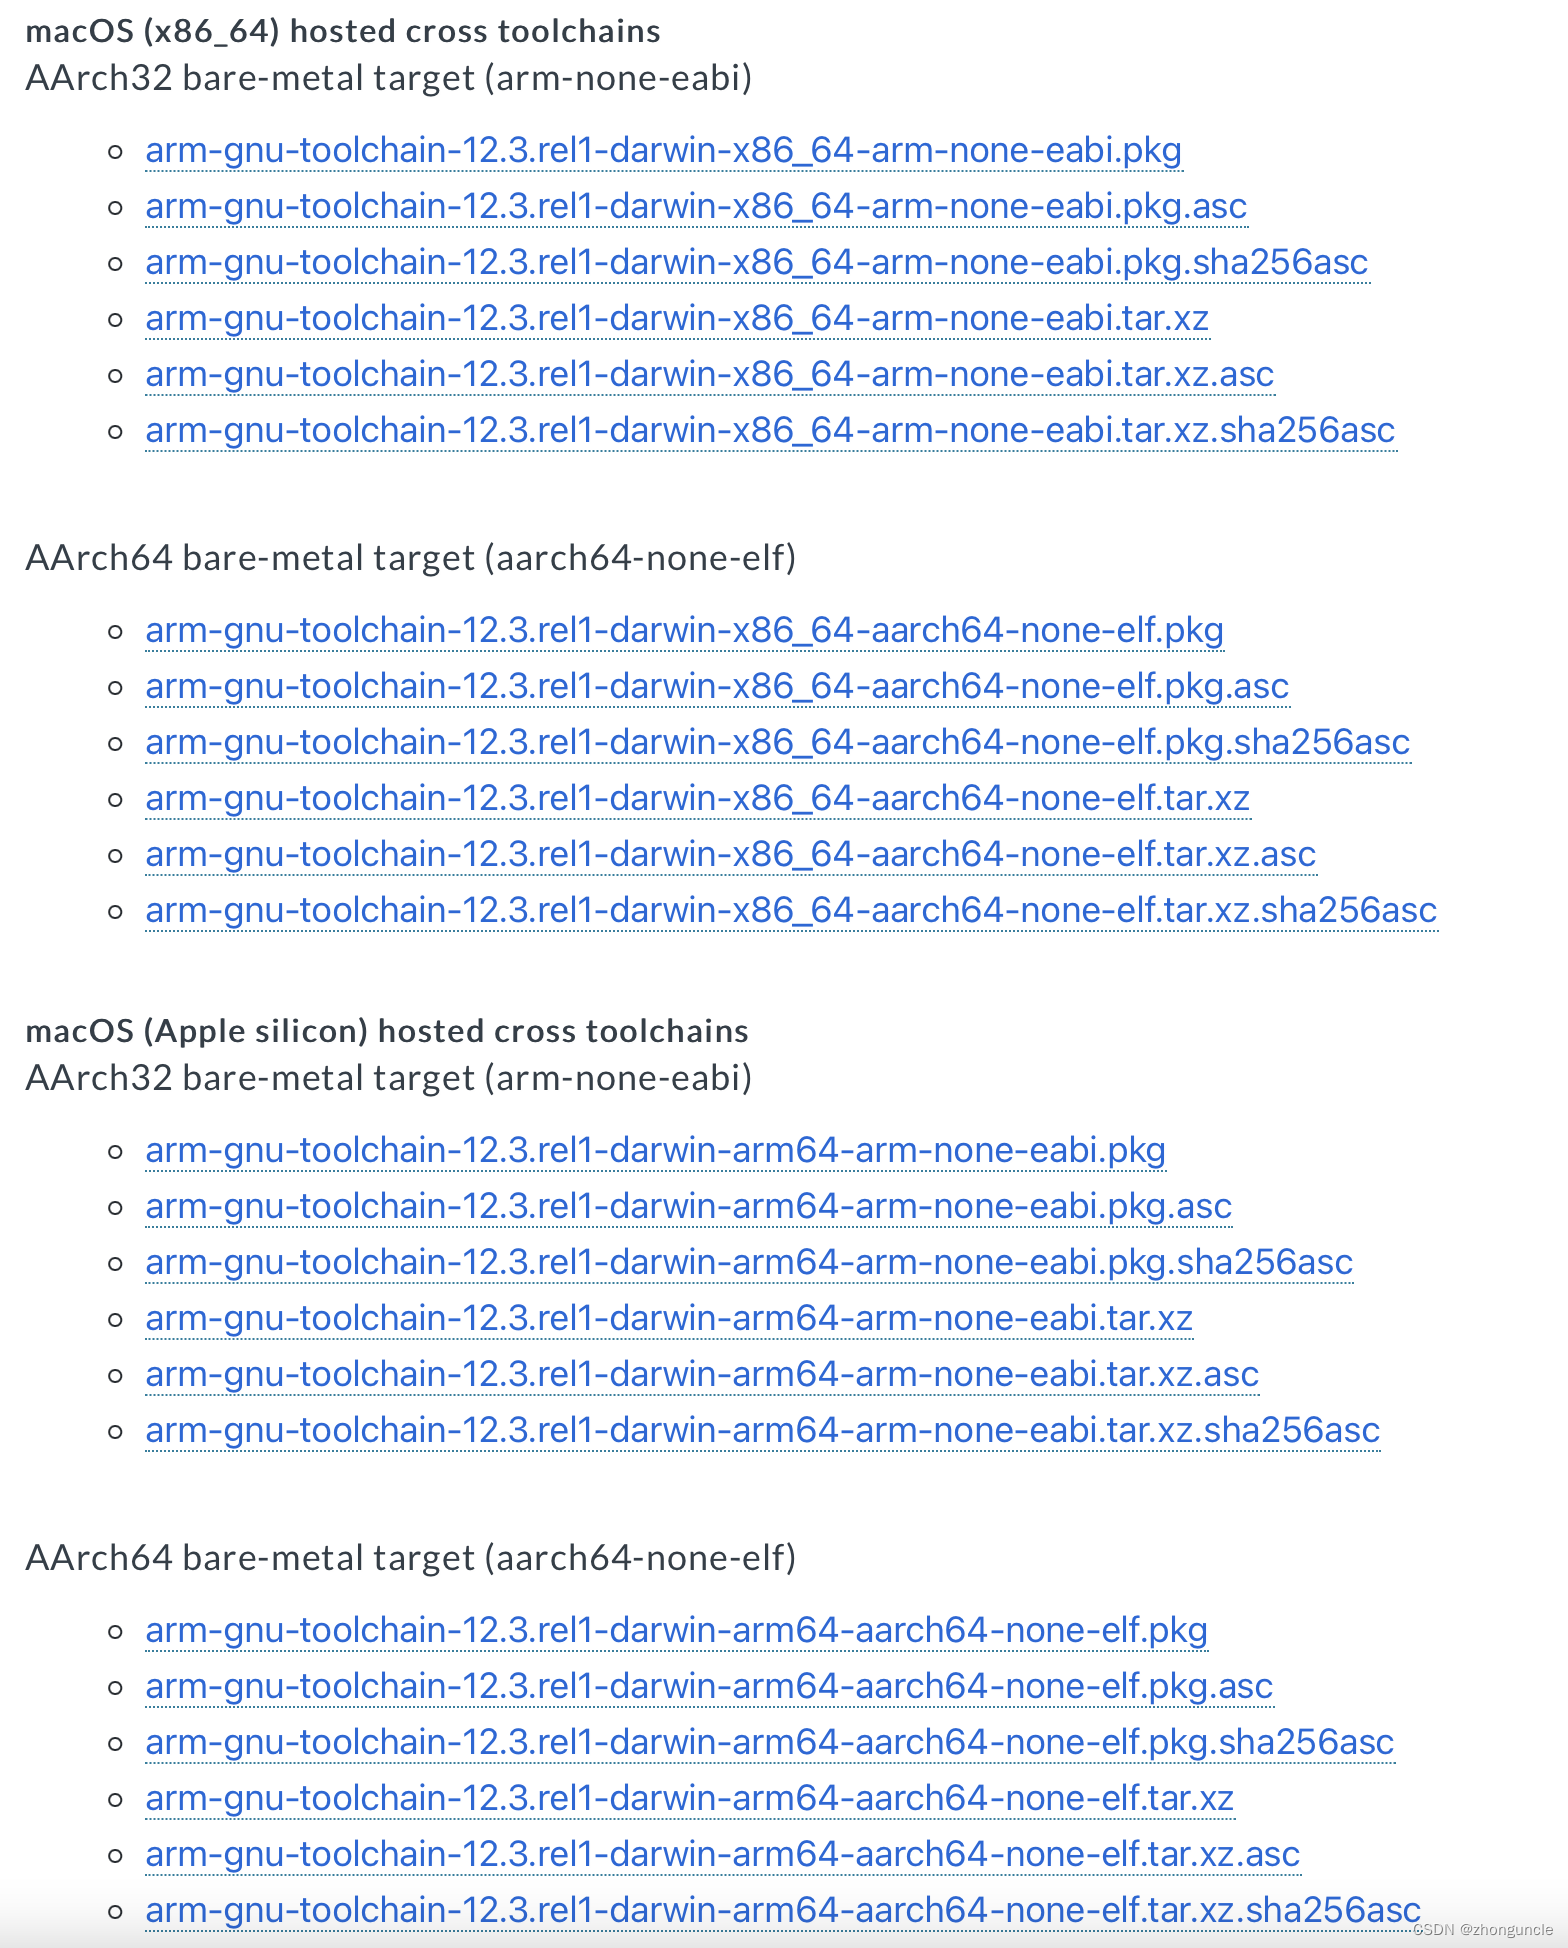
Select the link in AArch32 bare-metal target (arm-none-eabi) for your corresponding platform (processor architecture) and click to download. Choose AArch32 because the Arm Cortex M0 included in RP2040 is 32-bit, which means AArch32. If you download AArch64 bare-metal target (aarch64-none-elf), it will cannot compile successfully.
Install tool chain
If you downloaded the tar.xz, use the following command to unarchive it:
$ tar xvf arm-gnu-toolchain-version-darwin-arm64-arm-none-eabi.tar.xz
Put it in any path you like.
If you downloaded the PKG, it will installs in /Applications/:
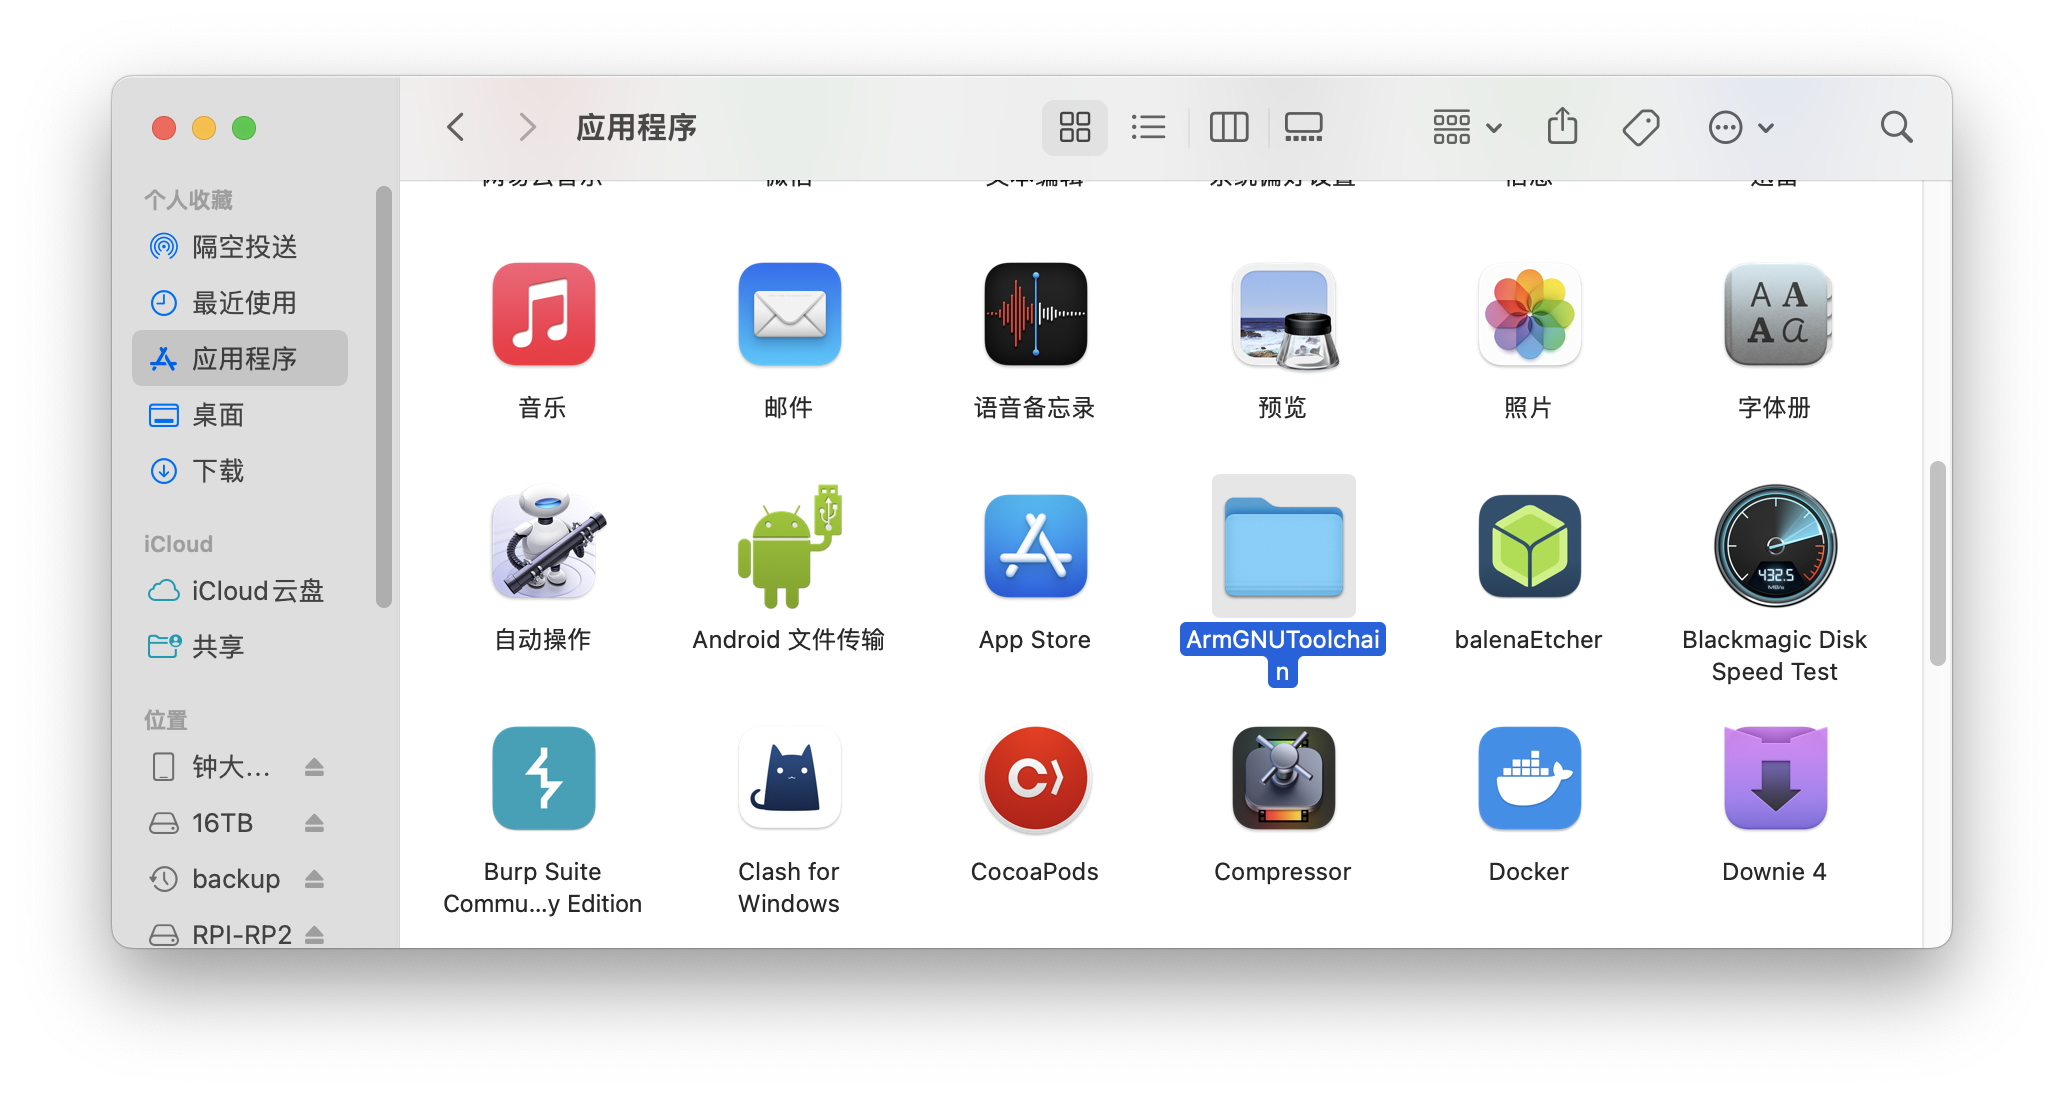
The absolute path is /Applications/ArmGNUToolchain/.
Configure tool chain
Next, configure the tool chain as before for cmake. The method is that add the binary directory of arm-none-eabi to the environment variable PATH, so that you can use the tools inside.
If you use tar.xz, then add the following statement in the Shell configuration file (it may vary slightly depending on the version):
export PATH="$PATH:~/arm-gnu-toolchain-12.3.rel1-darwin-arm64-arm-none-eabi/bin"
If it is installed using PKG, then add the following statement in the Shell configuration file (it may vary slightly depending on the version):
export PATH="$PATH:/Applications/ArmGNUToolchain/version/arm-none-eabi/bin"
~/arm-gnu-toolchain-12.3.rel1-darwin-arm64-arm-none-eabi is the location where you unarchive before. Select the bin directory. This directory should contain C /C++ compilers arm-none-eabi-gcc and arm-none-eabi-g++, the contents are roughly as follows:
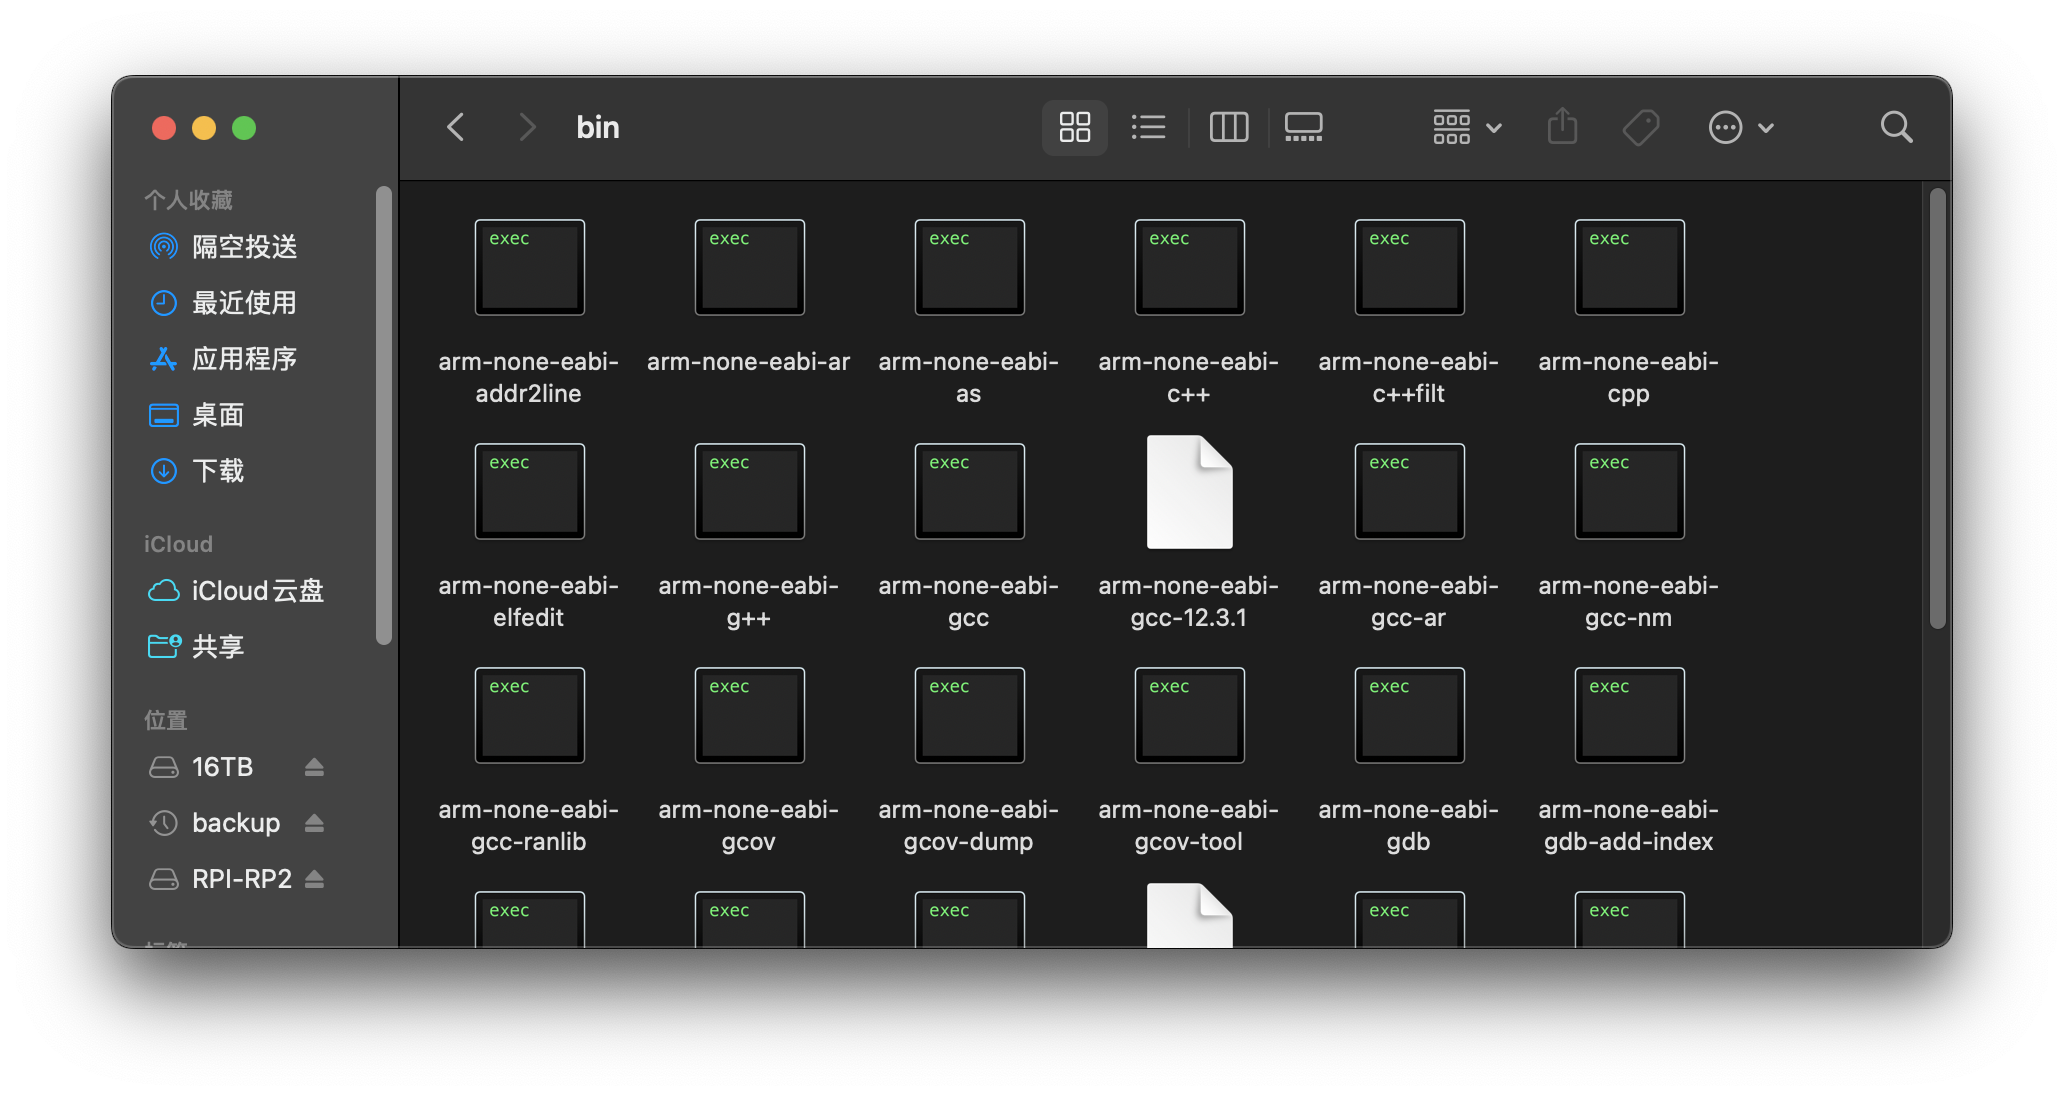
No including the bin of arm-none-eabi.
Now we prepare all for cross-compile.
Build project
Here we use a self-made example and official example pico-examples to introduce some commands for projects.
First create a new pico directory to store these examples:
$ mkdir pico
$ cd pico
Simple example
Next, a simple self-made example is introduced. Follow the following command to create a new directory blink, and then create some files and directories in it:
# Create a new `blink` directory and enter
$ mkdir blink
$ cd blink
# Create two blank files blink.c and CMakeLists.txt
$ touch blink.c CMakeLists.txt
# Copy the pico_sdk_import.cmake from the pico-sdk project to the current directory
# If you have not set PICO_SDK_PATH before, then use your pico-sdk path
$ cp $PICO_SDK_PATH/external/pico_sdk_import.cmake .
Then add the following content to the blink.c, which blinking the LED on the Raspberry Pi Pico (If you have a Pico W, do not use the following code):
#include "pico/stdlib.h"

const uint LED_PIN = 25;

int main() {

	gpio_init(LED_PIN);
	gpio_set_dir(LED_PIN, GPIO_OUT);
	gpio_put(LED_PIN, 0);

	while (true) {
		gpio_put(LED_PIN, 1);
		sleep_ms(250);
		gpio_put(LED_PIN, 0);
		sleep_ms(250);
	}
}
If yours is a Pico W, then use the following code instead of the above. Because the onboard LED of the Pico W is connected to the GPIO of the wireless chip, rather than be connected to the RP2040. So 25 pin is Wi-Fi instead of LED. Now the code used is:
#include "pico/stdlib.h"
#include "pico/cyw43_arch.h"

int main() {
    stdio_init_all();
    if (cyw43_arch_init()) {
        printf("Wi-Fi init failed");
        return -1;
    }
    while (true) {
        cyw43_arch_gpio_put(CYW43_WL_GPIO_LED_PIN, 1);
        sleep_ms(250);
        cyw43_arch_gpio_put(CYW43_WL_GPIO_LED_PIN, 0);
        sleep_ms(250);
    }
}
The content of CMakeLists.txt:
cmake_minimum_required(VERSION 3.17)

include(pico_sdk_import.cmake)

set(CMAKE_SYSTEM_NAME Linux)
set(CMAKE_SYSTEM_PROCESSOR arm)

project(blink)

pico_sdk_init()


add_executable(blink
blink.c
)

target_link_libraries(blink pico_stdlib)

pico_add_extra_outputs(blink)
Creating a new directory named build to store the built content:
$ mkdir build
$ cd build
This is a good convention for building projects, because it is convenient to clean up files built, and it is also a convention of cmake.
Then building project:
$ cmake ..
$ make -j4
If any errors occur during the build process, completely clear the build directory before next build! Option make -j4 will use all CPU cores to build.
After successful build will display the following:

Now build look like:

pico-examples
Back to pico:
$ cd ../..
Download pico-examples:
# Https
$ git clone https://github.com/raspberrypi/pico-examples.git
# SSH
$ git clone git@github.com:raspberrypi/pico-examples.git
Move topico-examples, and create build again:
$ cd pico-examples
$ mkdir build
$ cd build
As same as simple example, build project using below command:
$ cmake ..
$ make -j4
Why make uses option -j
Here is an explanation of why use option -j4:
- The option
-j4means “run 4 tasks or commands at the same time”. If you usemakedirectly, the errorfatal error: cannot read spec file 'nosys.specs': No such file or directorymay occur. In other words, one has to wait for the other long time. - But the main purpose of using
-j4is to speed up the build.
What is the speed difference between the two? I did a test and can see that the actual time spent (real) is reduced to about a third (left use -j4, right not use):
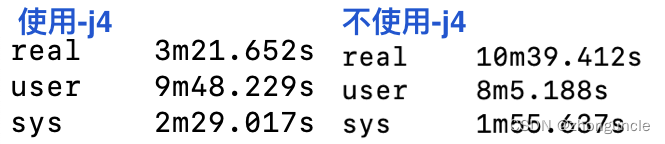
Because -j4 takes advantage of more processes, and more processes means can use more threads. This can improve CPU utilization and reduce program running time, so you can see that users who use -j4 use CPU time (user) and system use CPU time (sys) are higher than those not use -j4 case.
You can modify the number 4 in -j4 to use all your processes. Since the CPU utilization of this task is very high and there are few blocking and sleeping situations, the upper limit is probably the number of your threads. Higher values will bring improvements.
But 4 is a very good choice because:
- If you have tried multi-thread programming, you will know that
4threads are an inflection point. After many tasks exceed4, the performance improvement curve brought by the number of threads will slow down. The improvement brought by adding one thread before may need to increase by two. It takes three threads to achieve it. - The number of threads that many processors can run simultaneously is still not enough, and
4is acceptable for many machines.
Import binary file compiled
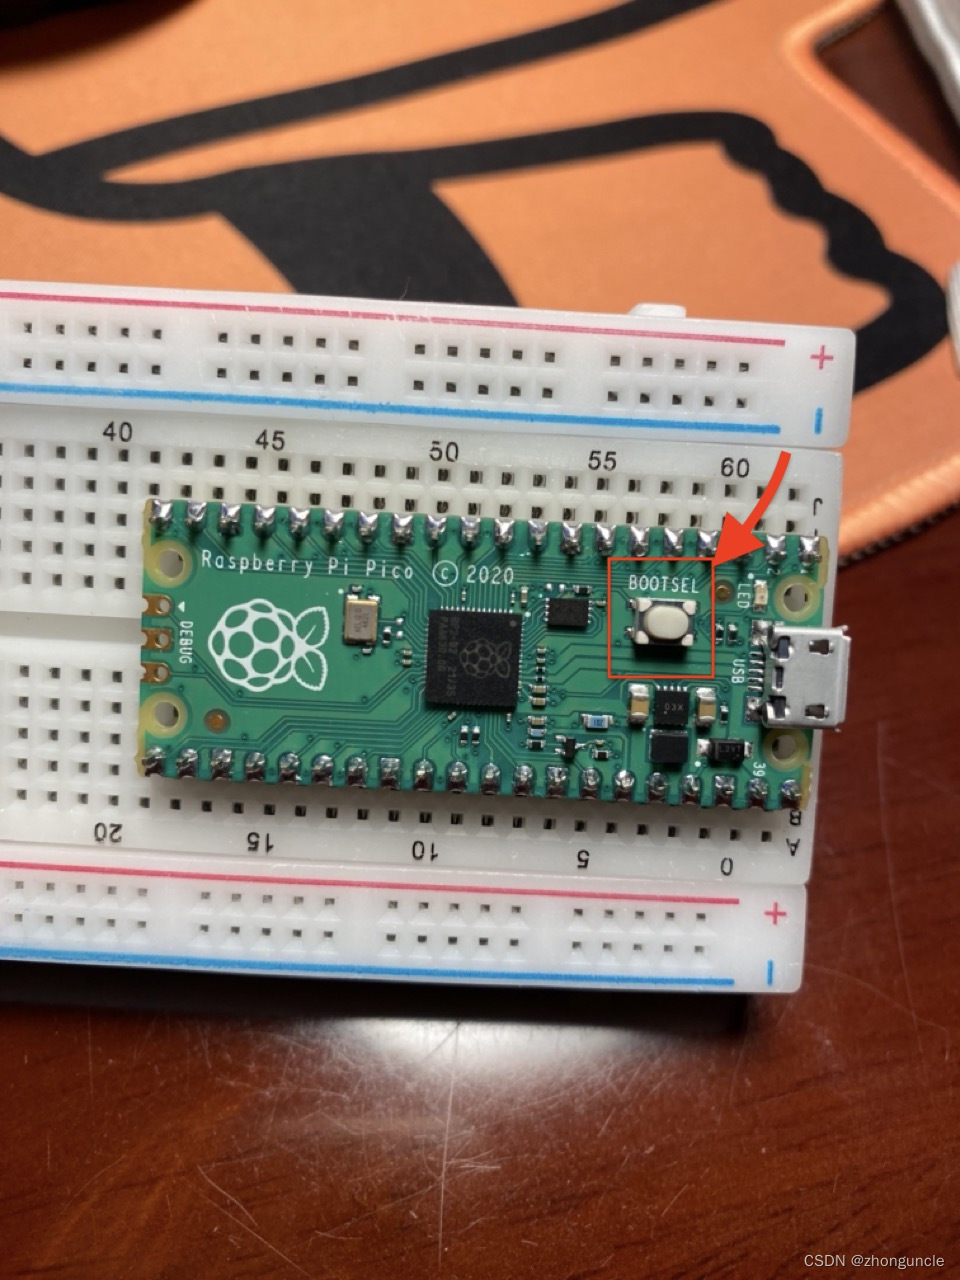
The import method is very simple. First unplug your Raspberry Pi Pico, and then press and hold button “BOOTSEl” on the Raspberry Pi, as follows:
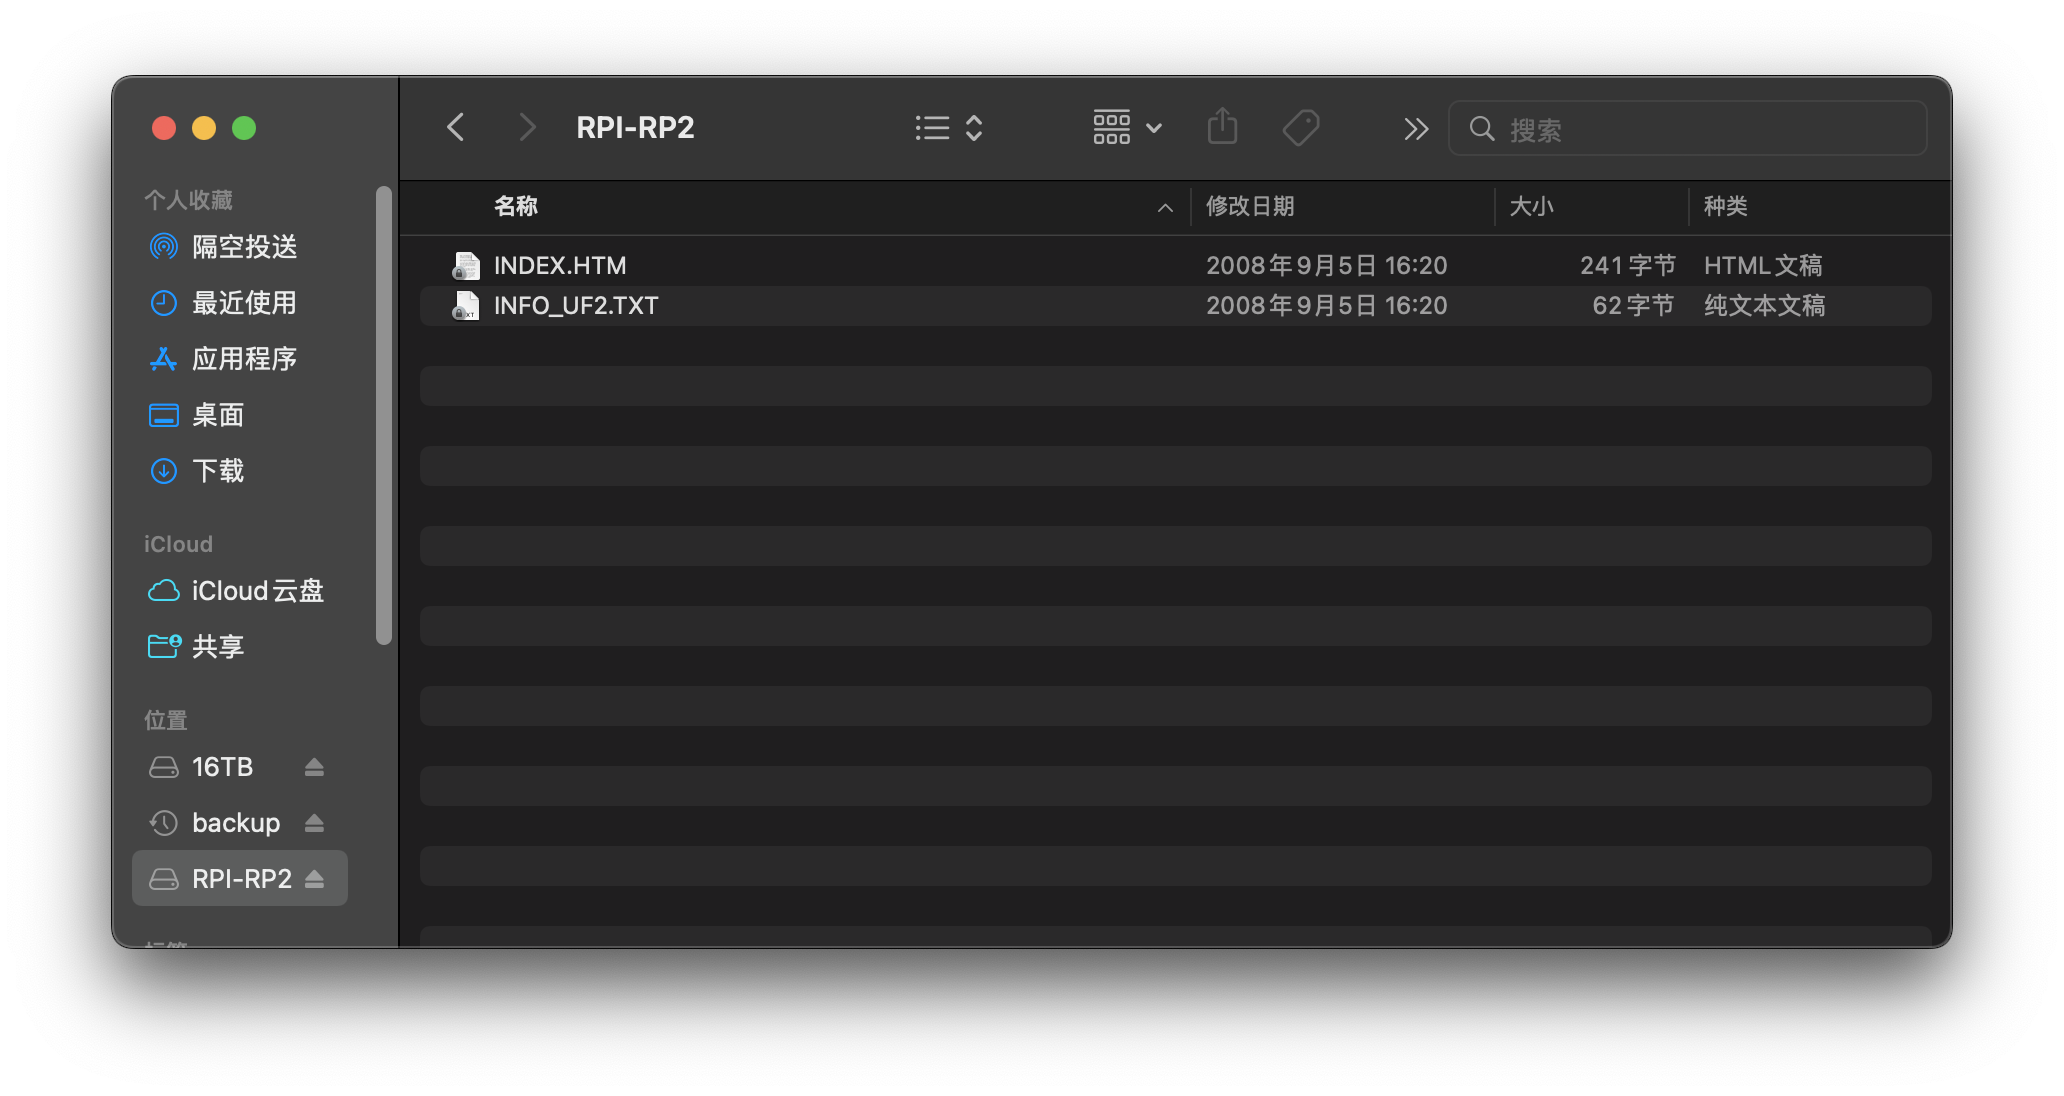
Then plug in the cable and connect it to your Mac. Raspberry Pi Pico will shows as USB mass storage.
So you can find a USB storage device named RPI-RP2:
Then drag the .uf2 file to RPI-RP2. After dragging in, it will display “The disk was not ejected normally.” Don’t worry, it is nothing.
After you drag blink.uf2 to RPI-RP2, the LED starts to blink. If you have used MicroPython for programming before, you need to reinstall MicroPython later, because the imported file will replace the previous MicroPython.
Though you reboot the Pico, it continues to blink. If you want to reset the Raspberry Pi Pico to stop blink, you can disconnect and hold the button again to enter the USB storage mode to reset. However, the peripheral device maybe fail to reset, so use the method in my other blog to write a program to reset: How to reset the Raspberry Pi Pico (resetting the peripheral device failed)
I hope these will help someone in need~